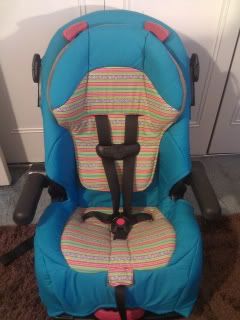
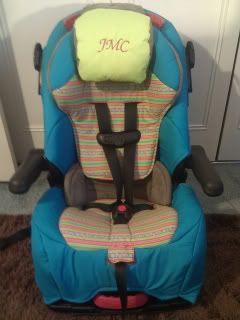
This week I tackled a crazy task. When doing some hunting around on www.ChildMade.com I found some blogs of folks who had done car seat re-covers.
My first thought was, no way! But of course when I saw it, yes way!
Then I thought, that has to be extremely difficult, so I shrugged it off and didn't think of it again until I took the cover off Jaiden's seat to be washed. After washing it and letting it dry I realized it looked dirty still and I wasn't pleased with the look any longer. The icky brown stained so easily and looked nasty all the time despite being clean. I have the Eddie Bauer 3-in-1 Convertible seat.
FYI: I did not remove any parts of the seat padding, I simply covered over the original fabric which was fused to the padding.
I picked out two fabrics from my collection (that means it was freeeeee!) that matched; one print and one solid. I chose a blue solid with a pink/green/blue linear print. For the thread I grabbed a bright pink color. You can't see it in the photos (well, it's the same thread color I used for the embroidery) but it looks neat around the edging of the blue.. makes it pop a little!
Really it is just a matter of ripping seams, laying the pieces on your fabric, pinning it together, cutting the fabric, and sewing the seams back together.
When I got to the seat area is when it got difficult. Navigating large chunks of fabric sewn together around a little machine isn't easy but I managed. I tried to watch what I pieced together and when I pieced it together so I could keep it from being so difficult. At some point you just have to deal with it and do your best not to slip your finger under the presser foot as you hold large padded pieces and shove them under the foot.
In this process you will use a lot of straight pins and a seam ripper!!
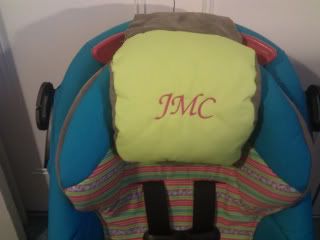
The last step I did was embroidering the pillow. I honestly forgot about the pillow. My daughter never used it but when I thought of embroidering it I couldn't help but do it... and I was so proud of myself! Not to mention Jaiden loves it. I have the Brother SE-400 Sewing and Embroidery machine. It is a dream to sew with and this project was the first time I ever did embroidery with it. You literally push a button and it does it for you! Fabulous! I admit when I ripped the seams of the pillow and sewed the embroidered fabric back on, I did it crooked so it makes the embroidery look crooked.
Nonetheless...
Some Tips Before You Get Started:
- Make sure you have the proper instructions handy for the car seat you are using. I can't find my book so I had to get the manual on the internet. You want to make sure you have this readily available for removing the belts and cover properly, and of course re-assembling them properly. We don't want to compromise the safety of the seat by putting it back together wrong!
- Don't remove parts and not use them. All the padding is there for a reason.
-Double DOUBLE check the padding when you are done for straight pins. I strongly suggest you use the pins with the glass heads so they are easier to work with and stand out more that a small tip head. You realllly don't want to put your padding back on with pins in it and have your toddler figure that out unexpectedly one day driving down the road.
- Use a strong needle, like one for denims. I think I already had the denim gauged needle on my machine. I don't remember ever switching it out. I have never broken or bent a needle in all my, watch out now, 6 months of owning my sewing machine.. and I have been pretty rough with them. But either way, you don't want to be very in to your project and have to stop to change out a needle and rethread it.
-Be prepared to get attacked. I got attacked by straight pins in the sewing process. I got attacked by a seam ripper in the seam ripping process. It just comes with the territory and you seasoned sewers surely know that by now. Just whatever you do, don't let the sewing machine attack you! I have heard of people getting fingers caught in machines. It hurts me to even think about it!
- Be prepared to spend up to about 5 hours on your project. I spent 2 hours uninterrupted one night, and about 3 or 4 hours slightly interrupted the next day. For smaller seats like infant carriers you might spend less time. I didn't do a bunch of detail on mine so that helped cut the time. In the original seat padding you can see the diamond patter on the upper part.. I didn't stitch that in to the new fabric. Thought about it, but it wasn't necessary and I was ready to get this thing done.
- Finally, just have fun with it! Let your kiddos pick out favorite colors if they are old enough, maybe try something neutral if you plan to have more children that may use the seat, and take breaks. Don't try and force yourself to finish it all in one day. Do it during a period where you know you won't be going anywhere if there isn't an extra seat handy.
- Oh, and I wouldn't do it if the seat is close to expiring or your child is about to grow out of it. Yes, car seats expire. Check the back side ;)


No comments:
Post a Comment
I LOVE comments so please leave one about my post before continuing on your creative journey!