Tuesday, January 31, 2012

DIY Smoothie Packs!

As usual, Pinterest is awesome! This week I did a  DIY smoothie packs. Here's how I did it!

To make your own, this is what you'll need:

~ Yogurt (I bought a big tub of Kroger brand low-fat plain yogurt, $1.75)
~ Strawberries (out of season at $2.99... but you can buy them frozen if you prefer)
~ Kiwi (A 1lb pack was on sale for $1!)
~ Bananas, I used 2 (amazingly on sale at $.38/lb)
~ Any other fruits you want
~ Ziploc snack baggies
~ Muffin tin or ice cube trays
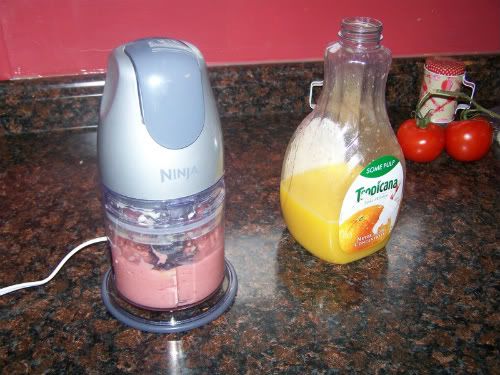
~ Milk or your favorite juice

Originally I think I used about 2-3 tbsp of yogurt scooped in to the muffin tins. When we tried it for the first time the yogurt was kind of overpowering. Granted we used plain and it can be a little more tart than flavored, but I was trying to go for less sugar. I might grab vanilla next time. If you use plain yogurt I advise to use less. I ended up breaking my frozen yogurt pieces to use smaller portions in the most recent taste test.

Slice up all your berries/fruits and lay them out on a cutting board. Put the muffin tin and cutting board of fruit in to the freezer and let them freeze up for an hour or so. You don't want to put unfrozen fruit in the bags or it'll freeze and stick together.

Pull everything out of the freezer. Start placing fruits in your snack baggies. I didn't make very big portions.

Photobucket

By the time you get all the fruits bagged up your yogurt should be thawed just enough to pop them out of the muffin tin with a fork or spoon. It really does thaw fast on its own so don't do anything to give it help. You can put the yogurt in to the bags with the fruit but for some odd reason I wasted bags and put the yogurt in to their own baggies.

I ended up with 9 bags of fruit! The first time, when I used the whole chunk of yogurt and my husband added way too much milk, we had a pretty good portion size. This time when I used less yogurt and a little bit of OJ (Mmmm pulp! I like to eat my OJ) we got about half a glass which was perfect for me.

Photobucket

Photobucket

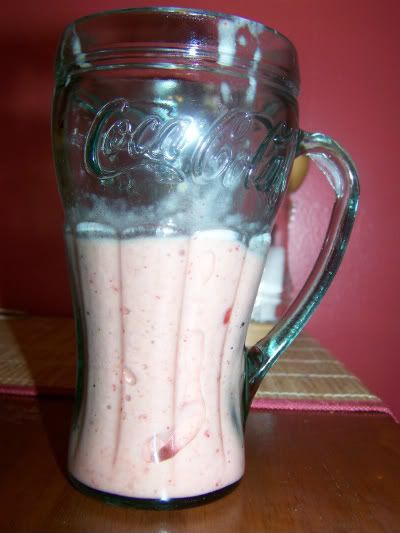
I made my daughter the strawberry kiwi baggie and used a little less OJ than I did for mine and she got the cutest little portion for her in a mini Coke glass:

Photobucket

In total the DIY smoothie packs cost me about $7! That would be $.77 per smoothie :D

I see this being a big hit when the weather really warms up and more fruits come in to season!!

~Lisa~


Monday, January 30, 2012

The Embarrassing Room Returns!

... And it is no longer nearly as embarrassing as it once was!!

The plan all along was to reorganize my extra room but a link party motivated me to get it done faster, and boy am I glad I did! Can't wait to unveil it over at
Lovely Crafty Home!
Lovely Crafty Home


Our extra room in the house is a multi-functional space. It is my sewing/craft room, my vanity space, husband's guitars, my clothes, ironing board and other random stuff. There was a lot of purging, Goodwilling and old fashioned organizing to get this space together but it is finally done. I have several photos for you to enjoy!

As a reminder here is the before photo and a link to the original post about the room. I made it small to spare you to heartache of its awfulness:

Photobucket

So, the flooring. Ya like that hot and steamy blue carpet?! Ooooh yeah!! 
GONE!

Photobucket
 
After my fabulous husband and his friend installed the flooring I got to chime back in with the real fun; bringing all the furniture in to the room and arranging it where I wanted it.

Photobucket

Quick and not so exciting glimpse of the closet and entry area (door is to the left). Still planning to hang and recover the ironing board to match.
(Here is a link to the ironing board cover!)

~~~~~
Photobucket

Photobucket

My vanity went in to the far outside corner of the bedroom from the door where the guitars were once hanging. I bought wood boards from the craft section at Walmart several months back, used batting, fabric, ribbon and a staple gun to create the hair clip holder. On the other one I added mug screws to hang jewelry from. I'm not a big jewelry person so it works for me.

~~~~~

Photobucket
 
Photobucket
 

Photobucket

My sewing table went right along the entrance to the room. I wanted the backside of it to be free from the wall so that fabric could easily flow down especially when sewing something large, which came in very handy when sewing the table skirt I made for it. This would also be the first time I have sewn a pleat, which wasn't so hard! I bought a large velcro package from Hancock Fabrics with a 40% off coupon (final cost $4 and change) to help hold it in place yet make it easily removable for washing.

~~~~~


Last year I bought this chair (plus the one at my vanity) from Walmart for $30. It was an expense but I was having an awful time finding two matching, sturdy, and nice-looking chairs anywhere else. The padding is a brown leather look so I purchased an accenting dark pink checkerboard fabric to match the flowers on the table skirt and hot glued it to the chair!

Both fabrics cost me about $20 but I bought a lot planning to do the ironing board cover & curtains which have not been done yet.

As you can also see, the table is a functional hiding spot for my husband's guitar amp which needs to stay in this room but is just too ugly and bulky to be out and about! Speaking of which, his guitars got moved to where my spool rack once hung next to the window.

Photobucket

~~~~~

Photobucket

Photobucket

This is the inside corner to the right of the vanity and directly behind the sewing table. On the floor shelf I've organized embroidery attachments, my file folder for patterns, accessories and my beloved stereo. No sewing space is complete without a stereo for relaxation :)

The wall shelf is pretty self-explanatory. It's home to a few special books, photos, a couple of jars for buttons and tiny notions, a basket of scissors, then the curtain rod I used to hang elastics, measuring tape, and ribbons!

~~~~~

Photobucket

Photobucket

The is the inside wall where the vanity once was. I painted the saying up last year right after I painted the room. Thought it was perfect for me! I decided to hang the spool rack I made from an old coat rack underneath it that way it fits in with the area, and is easy to reach when I'm sewing.


What I love most is that I have space on my floor even in this tiny room where I can lay things out, and it's not being put on carpet!! Oh that carpet was sooooooooooo nasty.... old, nasty.

Hope you enjoyed the room make-over! Nothing incredibly fancy but for something that was almost all DIY and cost me around $25 to get the finished product I wanted, I am happy! This room now holds the title for most organized and least cluttered spot in the house :)

~Lisa~

Trash to Treasure Tuesdays at Kammys Korner


Wednesday, January 25, 2012

Removing Baseboard Heaters

I'm telling you right now, this is as fancy as fancy gets. Your mind is about to blown by all of the insane detail in this tutorial.... that is not true. BUT I do have a few really good and possibly life-saving tips for you if you plan on removing old baseboard heaters!

****In all seriousness, I highly recommend doing some real research on this process. My post is meant to be very lightly informative and humorous!****


  My husband has been a tremendous help in this extra room project. He even took off work a couple hours early to get started. I do love him :)

1.) First thing's first, turn off the breaker to the heater! Nobody wants to get electrocuted eh?!

2.) Then unscrew lots of screws. We used the drill and even a manual screw driver to get it done as some are hard to reach.

3.) Rip that ugly thing off the wall and admire original drywall where you will have to paint and buy a new piece of trim to fill the gap.

4.) Wires. Now you need to undo the wires, cap them, and create a little box in the wall with a plate cover on the wall. Something to do with fire hazards and building codes... Remember the breaker we turned off? Yeah, not the right one. I was in the middle of ironing my skirt for work across the hall when I heard a pop and all the lights flicker. That would have been wires sparking!!

1.) Let's go back to step one: Don't turn of the breaker to the "heater"... which I found out later Hubster turned off the breaker to that room. Apparently that room and the heater are on different circuits. How 'bout turn off the breaker to the entire house! That'll do it for sure.

5.) Thank the Lord that when the wires sparked and welded themselves to the metal box that your husband was spared any injury,

6.) Cap wires, screw box to wall, and put the plate over the box!

Done!
(Step 6 not done in photo but I had to run off to work.)

Photobucket

Tuesday, January 24, 2012

Help! Link Parties, Facebook & More!

I really have so much to share yet so little to help me share it! No photos, no amazing before and afters yet... just in the process of everything. That's frustrating to me because usually when I start a project I desperately want it finished like ASAP, but with so much going on I'm having to take things slower which is ok.. I think I can manage!


***First off!*** 
I am going for 40 new friends over on my Facebook page by Friday!! You can find the link to that in the right hand column. Small goals, but it's still a very new page and I'm trying to spread the word! It's a good way to stay connected to you if you don't have a Blogger to follow me on! 
Help me reach my goal by sharing my page with your friends :)


On to what is going on with the DIY fun:

- I have no new photos to share with you on my extra room progress :( We have ripped up the carpet and padding (G-R-O-S-S). My husband has cleaned the subfloor (PHEW!!) and is currently pulling up staples and such in preparation for underlayment and then the laminate, eee!

- No updates in relation to my hallway project I have been trying to complete for a couple weeks (thanks a lot crummy weather!). I did spray paint some but that was last week, then it started raining.


- January 31st is the end date to my clutter challenge with the extra room, hence all the flooring work we are doing right now. I'm sure you might recall my post: Oh no, I'm Really Embarrassed that is linked up to the 
 

Lovely Crafty Home

Yeah, it's embarrassing. I won't deny that!

 I do believe this post will be out by Friday night assuming we get all the flooring laid & I can get the room organized the way I want it by then. Technically I have until the 31st so I guess I should quit rushing myself to get it out sooner, huh?!

- I linked up at my friend's page Hidden Treasures, her first Link Party!. It's a great blog for mom and women needing good Christian inspiration and she has many household tips & tricks! I also believe she just started selling homemade natural scrubs, lip balms and other goodies!
She is doing a Warming Up Winter link party where you can go share your recipes and different ways you keep warm when it's chilly outside!


And Finally...
What I'm HOPING to do is my first giveaway via the


It will be in relation to something neat I plan on sharing with you on February 13th, just in time for Valentine's Day! I'm sending up prayers that Lord willing and all goes as planned, I can share the news with you then and start the giveaway on February 15th! Trust me, you won't wanna miss it and it will really put a crazy new spin on some of the fun projects I'm planning on doing around the house! 
 
~Lisa~


Friday, January 20, 2012

IKEA Hackers, Loft Beds - More Tribute to Jaiden

Tonight while cruising Pinterest I ran across an absolutely awesome idea for a loft bed ladder. This person needed to find a better solution to the ladder that came with her loft bed because her young children could not climb up it. Instead they used an IKEA Trofast unit, attached it to the bed, added railing, and voila! New safe ladder PLUS extra storage :)

Photobucket

BUT the coolest part is not just that link but the SITE itself! IKEA Hackers! Ok, I'll be brutally honest. I have NEVER been inside an IKEA store before. the closest one is in Cincinatti which is a little over 2hrs from me. Never really had a need to go and the drive wasn't worth it for me to maybe, maybe not buy something. However my sister typically buys me things from there because she's pretty awesome like that ;)

We have decided when we do Jaiden's room (Remember my post A Little Girl's Dream Room?) we are not going to redo the crib. Instead we want to buy her a loft bed! I decided the other night a loft bed would be MUCH more practical and will fall right in to place with our small, space challenged home. IKEA so happens to have a neat one that is reversible... how cool!

Photobucket 
It's lower than I imagined but I think it will work. We will just have to wait and see. With a coat of paint it could truly be perfect.

My husband wants to try a playhouse idea if we can... something like this cool bed I found via Pinterest:

Photobucket

I still wish to accomplish the idea of a stage in her room with a dress up area and such, but right now I am working out a few space dilemmas... I'm finding out I may end up with more unexpected furniture in her room than originally thought.


Nonetheless, I hope this has given YOU some neat ideas and opened your creative minds to something you never thought possible!

I'll leave you with an even more extravagant idea for those of you looking for extreme space solutions for multiple children, featured over at DIY Show Off today:

Photobucket


~Lisa~


Sunday, January 15, 2012

Small Home Solutions: Stool redo

For more photos and a short tutorial on the frames and hooks, head back over to Small Home Solutions: Coat area!

Photobucket

For our small 3 bedroom house, space is critical as we are beginning to figure out, even for things like a coat area! And with a small living room, seating is in short supply as well. So why not create a new space to hang our coats, personalize it, and fit in a cute stool? Challenge accepted and completed :P

A little background on the stool idea. I had pretty much decided what my plans were, I just had to find the right stool, pick the accent color I wanted for my living room (of which 4 walls are green as you can see), and then do the work.


Let's take a short break for a Pinterest funny find:

Photobucket


Had your laugh?! I did too hehehe.


Ok, seriously now! I found some cute ideas especially in the yellow region. Yellow and white seem to work well together. And when I thought about it, yellow would make a fantastic accent color in my living room even when I go to recover my couch cushions some time in the future.


After a long days search I found the right stool for the project. To me and every other DIYer out there, it was just beautiful. To others, probably hopeless. I snagged it up for $9 which is a tad more than I planned on spending but it was seriously the only stool I could find that fit my plans.


Photobucket

There is some sort of panel nailed in to the top to cover a hole that was once that webbed wicker stuff. I assume somebody fell through it and they "patched" it up lol.

I had to get really creative here... what to cover the top with in order to give it cushion WITHOUT buying anything? Oh yeah, how about that old pillow I found under my bed!

Photobucket

Photobucket


Let's say it together, P E R F E C T!! I didn't even have to cut it down or anything! 


Before putting the pillow on it needed a few coats of white paint, a little roughing up and a coat of Polycrylic to match my TV stand and Coffee table redo.


To get that perfect pillow on to my beautiful stool all it took was a hot glue gun and some toasty fingers.


And then of course I had to add the pretty yellow checkerboard fabric. Again just some hot glue and toasty fingers... I did not fold the raw edges under or anything, I let them hang over while I glued because hot glue does not really work through two layers. I wanted to make sure it had a good "stick." Once it was all glued on I took an exacto knife and cut all the excess fabric off.


Finally, thanks to a fun basket at Hancock Fabrics full of adorable flowers I snagged up a couple of these golden yellow flower pins and attached one to the corner.

Photobucket


Photobucket


Photobucket

This beautiful new "Small Home Solution" cost me approximately $15 for the stool, fabric, and flower!


 OurDIYDiaries

The DIY Show Off
Trash to Treasure Tuesdays at Kammys Korner

Small Home Solutions: Coat area

This project is split in two posts so be sure to follow up with Small Home Solutions II: Stool redo. I felt the stool deserved its own post!

Photobucket

I am so excited to share this project. In my living room is a small space between our giant German shrunk and the wall along the hallway entrance. Typically it housed a plant, a vacuum cleaner.. other random things that fit there. Now it houses what you see above!


I wanted a more organized coat area that was not behind the living room door cluttering that wall and the full swing potential of the door. Plus where you find coats, shoes tend to gravitate further inhibiting door opening. So with the coat area I decided to go with a personalized touch. 


Photobucket
There is way more on that rack than you can see. Oh, and the wall isn't white anymore! That post to come eventually....


First, I took these old frames I inherited from my mom eons ago.


Photobucket


They got spray painted white. Eventually I decided to cover two of the frames with fabric.


To do the personalization I used Word 2011 and picked font "Parchment" then with the Word Art option I used whatever style it is that outlines the font. That made it to where I could use black marker to color in only what I wanted, in this case, just the letter. It's amazing what Word Art and enlarging a font can do... really gives you many different looks!


Lastly I took hooks from an IKEA wall-mounted coat rack (also given to me years ago), spray painted them white and, with long screws, hung them on the wall.


Photobucket


If ever there was motivation not to overload a hook with coats, them not being in studs ought to be it! I placed 2 up high for my husband and I, and one down low for our daughter to reach.


Photobucket


Technically the frame and hook project cost maybe a few cents. I bought a yard of the yellow heavy cotton fabric for $5 but obviously used very very little of it for the frames, and all of the other things I already had!


 OurDIYDiaries

Lovely Crafty Home
The DIY Show Off