Wednesday, May 16, 2012

Trend Lab Diaper - DIY Pocket

Once again, I do not yet have a baby to put my cloth diaper stash on but I'm trying to prepare myself as best as possible. Recently I purchased a Trend Lab brand diaper from a local store. I hear mixed reviews about them but it was only $12 and it can't possibly hurt to have one. Who knows, I may love it.

Anyway, Trend Lab diapers come with a microfiber snap-in insert. The diaper has no pocket for the insert. Unfortunately for that, microfiber is a material that many people advise NOT to put against baby's skin. Some people claim to have no issues but it seems the majority say it causes rashes and is too rough for the tiny precious bum. I'm going to be in the "better safe than sorry" crowd here and decide that microfiber will not be against my kiddo's raw hiney so I needed to come up with a solution

Here's my TL diaper.
Uploaded from the Photobucket Android App
 One option I had was to create a cover for the insert. In general the Trend Lab diapers are already going to be quite plush (especially when snapped down for a younger baby) since it's a one-size and the insert is pretty large and fairly thick (not a bad thing necessarily) I was afraid creating a cover for it would make it way too thick and possibly mess with the gussets and cause leaks. Maybe not, but oh well.

I opted, instead, the cut the polyester fleece lining in the diaper to create my own pocket to slide the insert in to! I had read a few reviews of people taking this route and having no complaints about the functionality of the diaper afterward.

So I laid the insert inside the diaper and marked where I wanted to cut the slit and how wide to cut it. I made the slit on the end with the button snap (front of the diaper). 

Since the fleece is pretty stretchy and thin I decided to zig zag stitch up the edges so the slit wouldn't rip further and the raw edges wouldn't roll up like they were doing once I cut it.
Uploaded from the Photobucket Android App
Here it is with the insert tucked in the pocket and snapped on to the diaper! 
 Uploaded from the Photobucket Android App
Voila! Simple as that!
Hopefully that helps some of the unsuspected Trend Lab diaper buyers out there, or maybe it'll change your mind about their product and give you a reason to buy a few more.

~Lisa~ 

Top Mommy Blogs - Mom Blog Directory


I MADE THIS

DIY Cloth Diaper Inserts - Part I

Check out Part II for making regular microfiber inserts!

DIY Cloth DIaper Inserts - Part II (Microfriber!)
UPDATE: See Cloth Diaper Follow-Up for a recent review!

I have to forewarn you that I do not have a baby to try them out on (yet)
These inserts should work just fine for any pocket diaper also. You will need to adjust the size accordingly.

I have done a descent amount of recearch lately trying to figure out what will make good CD inserts for my gDiapers. Most of what I'm reading advises to use a polyester (or more pricey bamboo) fleece outer layer with a microfiber or hemp inner layer. Really any fabric that has a good absorbency is what you're looking for in an inner. The outer layer is to help wick away moisture from baby's sweet tush so that's where polyester fleece comes in handy. I have also heard of people using flannel as the outer layer. If you hunt around on websites that sell inserts just pay attention to what they say they are made out of. If it works well enough for them to sell, it should work well enough for you to make!


What you need:

Outer Layer:
                   ~ Polyester fleece - I purchased 2yds (cream color) since it was on sale, ab $12
          OR   ~ Suede cloth - This will also work as an outer layer. It's very soft! Some people simply make little suede cloth 'socks' to slide the microfiber in and out of.
         OR  ~ Flannel - I did purchase flannel later down the road to test out as you will see. I paid $7 and change for 2 1/4yds. I have read some sites sell flannel inserts (6-8 layers of only flannel) I guess as "extras" to stack on top of other inserts for naps or when baby may not get a changed diaper for a while.

Inner Layer:
           ~ Microfiber - I purchased a 15pk of towels from Walmart for $10. They are thicker than some of the other ones they had. If you cut it right, you can get 4 (small size) pieces per towel.
Uploaded from the Photobucket Android App
Heads up: Microfiber makes a huge mess when you cut it especially with these thicker towels.. you'll have little fiber pieces floating around everywhere! The rotary cutter comes in super handy here with helping to contain the mess.
~ Sewing machine and/or Serger
~ Scissors or rotary mat
~ Straight pins - I use the kind with the little glass heads on them.
~ Pattern or measurements - I used the size small gDiaper cloth inserts (before they were washed) to get a good measurement.

I did not pre-wash any of my material. It's not necessary. I preferred to wash my inserts once they were all put together. I felt like the fleece would stretch unnecessarily if I pre-washed it.

gDiaper insert measurements:

The measurement for a small size is about  4 1/2 - 5inches X 11 1/2 inches. I didn't write it down so I'm measuring the one I made... next time I'll write these things down!

According to my friend who has a baby in size Medium diapers her inserts measure 5 1/2 X 13 inches. These are the same size inserts for the Large/Extra Large gDiapers.

Start Cutting:

In my first insert I cut out the microfiber about 1/4 to a 1/2in smaller all the way around than the measurements. I wanted the inserts to be tucked inside the fleece. So the fleece got cut to the above measurements for the small size. This is no exact science so don't fret about your measurements.

Uploaded from the Photobucket Android App

Layering:

I laid 2 layers of microfiber inside the two layers of fleece and pinned them together. Watch your fleece closely. You can tell by looking at it which side is the wrong side (you can see the lines where the fibers are worked together). You'll want that facing the microfiber so the "right" side of the fleece is facing baby's tush.

Stitching:

About 1/4 inch in from the edge of the fleece do a straight stitch all the way around (you can see that in the finished product below... and I did way more than 1/4 on my first insert lol). Make sure you are straight stitching through ALL layers and not just the fleece.

Once you have it straight stitched all the way around, trim up the outer edges to even them out (I did not do this on my first insert).

Now you will want to do a zig zag stitch (or if you have a serger, serge!) all the way around the outside edges. Try your best to make sure the outside of the zig zag goes off the fabric so it seals up the edges, just like a serger does. Do this around the entire insert. 

Again, not an exact science and if you're like me and can't sew straight to save your life, don't worry. It'll work either way but the closer to the edge the better.

I used this particular zig zag that does a little bit of straight stitch also (the highlighted one on the far right). I figured it would be a better hold. Later on I ended up going with the regular zig-zag, it's the far left stitch on my machine that is partially cut off. Regular zig zag moves a lot faster and is a tighter stitch.
Uploaded from the Photobucket Android App


Here is the finished product of my second ever handmade insert. This was done with regular scissors and rounded edges. It is also not washed yet as you see it here.
Uploaded from the Photobucket Android App

 I made two inserts initially. One of them I did not do the straight stitch around, just the zig zag, so it looks kind of sloppy IMO especially after having been washed. It'll work but luckily I feel I have improved my technique a lot now that I have made about 15 of them.

More Photos & Info:

My insert (bottom) VS gDiaper insert (top)
You can't tell here but they are pretty much the same thickness.
 Uploaded from the Photobucket Android App

Left: gDiaper insert in small gDiaper
VS
Right: My insert in small gDiaper
Perfect fit!
Uploaded from the Photobucket Android AppUploaded from the Photobucket Android App
 Changing it up, more layers and different fabrics:

I have since made a few inserts with 3 layers of microfiber with fleece outer layers to help with extra absorbency and some with 2 layers microfiber sandwiched between 2 layers of flannel on top and bottom (4 total flannel layers).

With this batch I finally went out and bought a rotary mat and cutter. Ooooh how did I go so long without one?! I was intimidated by the Olfa brand that is so incredibly expensive at craft stores but Walmart actually sells a self-healing mat for about $14 and a cutter for about $13. I don't *like* to spend money like that but I really know this will come in so incredibly handy, and already has!

I basically made this last bunch with all the material the same size so you will see the microfiber peaking out the sides. I highly doubt that will be an issue. Some of it will probably even wash off if it's loose fibers. 
 Left: 2 microfiber layers btw fleece
Right: 3 microfiber layers btw fleece

Flannel (2 top and 2 bottom layers) with 2 microfiber layers in the middle.
Photobucket

Some of my (small size) fleece/microfiber inserts.
Photobucket

Approximate Cost:

I have yet to use all of the microfiber (have about 4 towels left) and have also not used all of my fleece or flannel (maybe a bit more than half the fleece left and 3/4 if not more of the flannel left). My estimate so far is that these inserts are costing me about $.50 cents to make. Once I've used all the fabric I'll have a better idea of the cost per unit!

Washing & Prep:

I went by the gDiaper insert instructions on prepping my inserts, but also took advice from other brands. Initial washing and prep is pretty easy, just time consuming. They recommend to wash the inserts approximately 3 times before first use in HOT water with NO detergent and NO fabric softeners.

***I am editing this slightly because as I do more research I'm hearing that polyester fleece and/or microfiber does not have to be prep washed multiple times, that just once in hot water will do. I believe the additional washes come with fabrics like the bamboo or hemp (which is probably why gDiaper inserts are recommended to be washed multiple times).

Tumble dry LOW with NO fabric sheets (I had to take my Downy dryer bar out).

They should be good to go after that!

Soon I hope to give everyone a good review of how well they work compared to the regular gDiaper inserts, but based on everything I have read and the few tutorials I have come across nobody seems to be complaining that they don't work!

~Lisa~

Top Mommy Blogs - Mom Blog Directory


I MADE THIS

Saturday, May 5, 2012

Matching Maxi Skirts

One of the blogs I have followed for a good while is Elle Apparel. She has so many adorable tutorials for sewing that are mostly really easy if you have the basic sewing stuff down. Last year I ran across her maxi skirt tutorial and swore I'd make one some day. The day finally came!

She made hers because she was pregnant but even if you aren't pregnant you can make one just the same. They are so incredibly comfortable! I decided to make one for myself the other night as a sort of stress reliever. I wore it two days in a row and if I hadn't gotten a little spaghetti sauce on it, I'd probably wear it for a week straight.

My daughter begged me to make her one because she thought mine was just too cute. Mine took approximately 30min and hers took about half that. If you follow the tutorial instructions it's definitely not difficult. I got intimidated by the elastic thread part but with a little practice on scrap fabric it was easy.

I wasn't looking for the beautiful "finished" look so where she used a double needle to hem the bottom I just used one straight stitch. I might eventually go back and run another row of stitching just to make it lays more flat and not risk rolling up but I'm not concerned about it. I'm in it for the comfort!!

My daughter and I:

Photobucket 


Hubby asked me for a belly shot so I reluctantly did one (20weeks and 2 days here). I'm not big on bare belly but I don't suppose it hurts anything. Plus it gives you a little bit of an idea on how I attached the waistband. My raw edges are on the inside of the skirt (just like Leanne did in her tutorial) so I can unfold the waistband as I get bigger, like you can see it did when I lifted my shirt. My daughter's is on the outside of the skirt since her waistband will mostly stay folded down (that's her in the background tearing my tree apart):

 Photobucket


Headband:
 Another cute idea... knit material is so forgiving you can do so much with it. I cut a strip of my material about 1 1/2 inches wide or so and long enough to wrap around my head and allow me to tie it so I could have a matching headband. No need to sew it because if you work it just a bit the raw edges will roll under and it'll look finished!

~Lisa~
Top Mommy Blogs - Mom Blog Directory

Tuesday, May 1, 2012

Loft Bed Canopy - Tutorial


I just shared the canopy I made for my daughter's bed HERE. I split the posts because with all the photos it was getting to be a really long post once I added all this to it. If you truly plan to make a canopy read the entire tutorial first. You don't have to follow what I did, it just helps you where you may need some and gives a few tips. I made it up as I went and I'm not a fantastic sewererer so I know anybody could do it! 

If I have the chance to make another one I'll clean things up and take my time. Maybe one day I can even make and sell them :)


100_5528


***Heads up, I am no good at tutorials in my opinion. I put photos here to help out where I can but I'm absolutely terrible at stopping long enough to take a picture of every step so please forgive me. I also tend to over-explain and fear I confuse and lose people in doing so. I have read and reread this over and over hoping I could fix things that sound redundant or dumb lol. If you have any questions PLEASE feel free to email me/leave a comment so I can get back with you! If there is something you would like a better photo of I'd be happy to take an additional picture and email it to you.***


Materials:
(This is what I used)

- Hot glue gun, sciccors, a rotary mat (I do not have one, I just use the big cardboard mat with the measurements on it) and of course your sewing machine! 

- Heavy off-white drapery fabric. I dug for a long time on a drapery remnant pile and found about 3 1/2 yards of the perfect material left for only $5 a yard. You can use a drop cloth, too. Just something heavy and sturdy to give it weight unlike plain cotton fabric. I still have a fair amount left over.

- Green fabric for the "grassy" bottom. I purchased about 1 1/2yds and used maybe half that.

- Pink fabric (ab 1yd) for the door. I planned to make window curtains but decided not to so I have about half a yard left.

- Brown fabric for binding and window boxes (if you choose to do binding). I believe I purchased 1/4 yard.

- Purple fabric for the ties. Also bought 1/4 yard.

- Burlap ribbon that I had on hand and used last minute.
- Thread. I used green, white and pink. I note in each section what color I used.

- Gerber daisy and misc. flowers I had leftover from my Spring wreath (still need to post that project!)

Initial Measuring & Cutting:

First grab your measurements from the bed. It is intimidating once you get all the numbers. This is the most tedious part IMO because if you mess this up you risk messing the whole shebang up, so take your time, double check measurements and #'s, write them down, THEN do the cutting. Let's just say lucky me I had enough of the drapery fabric ;)

- You want width of the front of the bed, inside the posts.
- Height of the front of bed inside the posts
- Width of end of the bed inside the posts
(the height can be duplicated of course)

I decided to use about 12 inches of the bottom as the grass. Keep this in mind now, whatever measurement you want for the bottom, because it helps you determine the height of the drapery fabric.

(DON'T CUT THE GREEN GRASSY BOTTOM UNTIL YOU HAVE THE DOOR CUT OUT OF YOUR DRAPERY FABRIC!!!)

I subtracted the 12 inch grassy bottom from the rest of the height measurement to get the length for my drapery fabric +2 inches, that way the top and bottom both had a 1 inch seam allowance (s.a.). With the width measurements I also added 2 inches for a 1 inch s.a. on both sides. You'll need 2 (or 3) cuts of the drapery fabric. I only cut 2 because the other side of the loft bed faces a wall. Make sure you have that 1 inch s.a. all the way around.

Initial Sewing:

- I used white thread
Start ironing your s.a. ONLY on the top and bottom of your draper fabric!! You'll do the sides later once you get the green fabric on. Iron it in again so that you tuck the raw edge under and end up with 1/2 inch seam. Pin as needed and straight stitch in either a coordinating thread with the fabric or a thread (like green or pink) that matches another fabric in the canopy. Do this with your 2 (or 3) sides... remember, top and bottom only for now!

Cutting Windows & Doors:

Here comes some more brain work... We need windows and a door! I used a square photo frame to trace and cut my windows out. Too lazy to sit there and figure out measurements. I started with the side piece of drapery fabric. Fold it in half so you have a crease running from top to bottom. Press the crease a little with your hands so that when you unfold it you can see the crease slightly. Lay it back out flat then lay your frame on top of the fabric where it is basically centered over the crease. Adjust how high up or down you want the window. Once you like its position, trace around it with a pen (or whatever you trace with). Cut out your window along the line you drew!

I took the side piece and laid it over the larger piece of fabric where I wanted the window on the front half to be. It was easier, that way the windows are centered the same. I just lined up the left edges so my window was on the left side of the front piece. I traced the hole (that I cut out on the side piece) on to to the front piece that was laying underneath. Pick up and put aside the side piece. Cut out the front piece window and, voila! You have two windows!

Then came the door. This took some real measuring unlike the windows. Like I did with the side piece for the window, I folded the large front piece in half to get a slight crease down the center from top to bottom. I used that crease as my center marker for the door cut out. I can't remember how high up I cut.. but remember you still have the grassy green to put on so however tall you want the entry to be, subtract 12 inches!! I think my entire door height is about 36 inches, so if that is the case, I only needed to cut up 24 inches in to my drapery fabric. Don't cut your door up so high to where it is within inches of the very top of the fabric. You'll want some distance between the top of the door and the top of the canopy for sturdiness. For width of the door I went out 10 inches from the crease on either side so the door is 20 inches wide.

Still with me?! I hope so!

Grassy Green Pieces:

Photobucket  
-I used green thread
Now you can cut your grassy green! Just measure the two front spots and the side spot. Since I wanted 12 inches of grassy green I measured 13 1/2 inches. I wanted the very bottom to be a 1/2 inch seam allowance (s.a), and the top that attaches to the drapery fabric to be a 1 inch s.a. Obviously once the raw edge is folded under again it ends up being 1/4 inch at the bottom and 1/2 inch at the top.

For your two front pieces of green (that hang on either side of the door):
Since the outsides of the drapery fabric are not yet sewn, measure it straight across and only add a seam allowance for the side that ends with the door frame. Iron/pin your s.a. and straight stitch the seams of the top, bottom and door side of the green fabric.

For your side piece of green:
Straight stitch the seams of the top and bottom only. Don't do the sides. They will be sewn after you attach it to the drapery fabric and close of the outside raw edges of your front and side pieces.

Now you can attach all your green pieces to the drapery fabric. I chose to have the green lay on top of the white so that's how I pinned it on (so that the 1/2 inch sewn seams overlap). Make sure the seamed edge lines up with the raw edge door frame before you pin. If the outside raw edge of the green doesn't line up perfectly with the white, don't worry. It shouldn't be off too bad if you measured pretty well. You'll fix that when you iron and sew that seam next.Straight stitch two rows about 1/4 inch apart across the seams to attach the green to the white.

Once you have all your green attached you can now sew the seam of the 4 total outside raw edges. I used a 1 inch s.a. so that I got my 1/2 seam. This will stretch from the top of the drapery fabric all the way to the bottom of the green fabric. Straight stitch all the seams. You should now have all outside raw edges of your canopy sewn! The draper fabric on the door and windows will still be raw edges.


Framing Your Windows:
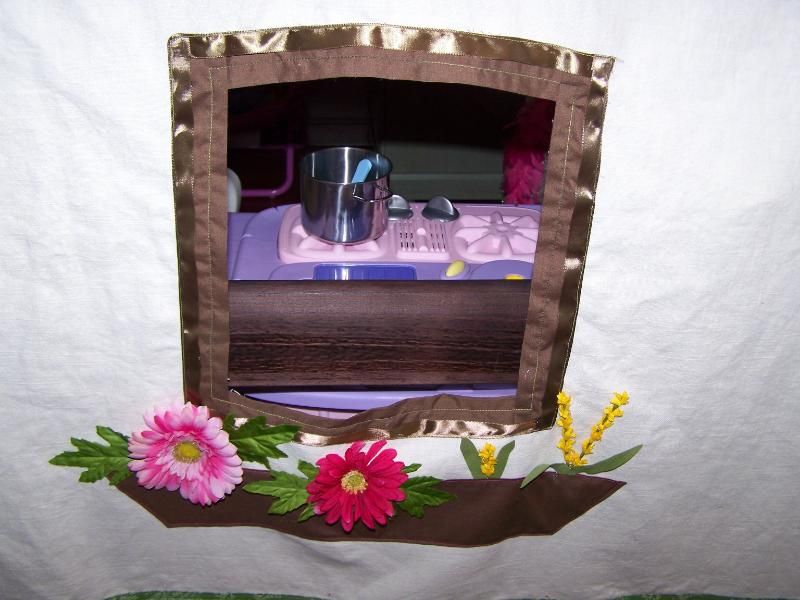
Photobucket Photobucket -I used green thread 
Obviously both of my windows look different. I started with the side window (one pictured on the right), trying to do binding. Bleh, I gave up on that. Trying to get folded edges and the corners and all that looking nice was a no go. I literally laid 4 pieces of fabric that were ironed and folded in half length wise around the window. The folded edge of the brown lays slightly over the raw edge of the frame to cover it up. I straight stitched the brown on. I then used ribbon to cover the outside raw edges of the brown fabric. I hot glued that on then stitched the outside edge of it. <--- Very lazy and I didn't do much thinking to come up with this. It was very spontaneous and it just happened to work, kinda.

Then I remembered I had burlap ribbon. I used that to cover the other window edge, making it hang over the raw edge a little so it couldn't be seen.I zig-zag stitched the ribbon on the inside edge that was still on the drapery fabric to seal up that edge, then zig-zag stitched the outside of the ribbon to finish it off. (Zig-zag was used because the ribbon is separate little lines of string all attached together.)

Door:

Photobucket
 - I used green thread
Improvising.... I ran out of ribbon, well, obviously there wasn't enough to do the door frame entirely so I chopped it up and put the ribbon on the bottom over the green, and across the top. I used more folded brown fabric for the door. This time I measured the brown fabric out length wise, and made it about 3 1/2 inches wide. I folded one long edge in 1/2 inch and ironed it, then folded in 1 1/2 inches (the width of the ribbon) and ironed again. This allowed me to wrap the brown ribbon around the raw edge yet have 1 1/2 inches of brown fabric on the outside that lined up with the ribbon... no raw edged visible! (I need a photo of this, but there is probably a better way to do it)

I straight stitched the brown fabric on, then zig-zag stitched the ribbon on.

Door Curtain:
100_5520  
- I used green thread
For the door curtain I cut 1 piece of pink fabric the height of the door + 1 inch so I could sew it to the inside of the top. I added 2 inches to the width of the door frame so I could sew the sides to the inside of the door. It was something like 37 inches (36 inch tall door opening) by 22 inches (20 inch wide door opening). I folded the piece in half length-wise and cut it down the center. I sewed the inside edges and bottom of the curtain pieces using a 1/2 inch s.a.

With the front canopy piece laying face down, I laid the pink fabric face down and lined it up how I wanted it to hang. I overlapped the center (sewn edges) of the fabric by maybe 1/2 an inch or so, pinned all the outside edges of the pink to the rest of the canopy and sewed it on. I used the green thread and tried my best to go over the same stitching I had already done on the framing of the door.

Window boxes:
Photobucket Photobucket
-I used pink thread
This was pretty simple. Measure out how tall and wide you want your boxes. Cut out the fabric. Fold it in half then cut the short sides at an angle so that when you unfold it you have what you see above. Carefully fold and iron the edges under by about 1/4 inch all the way around to get rid of the raw edges, then pin and straight stitch on to your canopy.

Hanging Ties

Photobucket 
 -I used green thread
 I chose a deep purple, almost royal purple, for the ties to attach the canopy to the bed. I also picked out Velcro to use in between the ties just in case there wasn't enough support. Luckily I did not need it but I'm happy to hang on to it for 40% off! I cut several long purple strips, probably about 12 inches or so long and 1 - 1 1/2 inches wide. This is not an exact science... just going with the flow! I needed to make sure I had enough to wrap around the bed rail and still have some left to tie so keep that in mind when cutting the length.

I then went super lame and instead of cleaning up edges and sewing fancy and all that jazz, I took the strips to the sewing machine and straight stitched green all the way around the strip a little less than 1/4 inch from the raw edge. Again, not an exact science and doesn't need to look perfect. That will protect the edges a bit. Since I don't plan to take the canopy down often, or at all if I can avoid it, I'm not worried about the raw edges :)

Attaching them to the canopy:
(something else I need a good photo of)
I folded the front piece of the canopy in half, wrong sides touching. I opted to put one tie in the very center (where the fold is) right above the door. One tie on both ends, then 2 ties in between so that gave me a total of 7 ties on the front piece. I folded the ties in half to get the center, laid them back out flat on the outside of the top seam and pinned it down. I stitched across the inside of the tie (that is laying on TOP of the seam) twice... once at the top of the drapery fabric seam and the other about 1/2 inch down. This will hold the ties on to the canopy pretty well. Make sure you back stitch your ends that way they don't unstitch and pull apart under the weight of the hanging fabric.

Decorating Your Canopy:
Photobucket Photobucket

Ok, we are ALMOST DONE!!! Wooooo! This is the fun part... decorating your canopy however you'd like. Ididn't go all out at this point, just kept it pretty simple with flowers. I used Gerber Daisies and another little flowery thingy I had in a stash leftover from a wreath I made. I plucked them off the stems along with the leaves and hot glued them "in" to the flower boxes. I added some other little flowers to the spot that is under the ladder so that section wasn't so bare. I'm still hunting down these little curtain butterflies I have had forever so I can maybe glue a few butterflies on but no luck so far.

Hang your canopy tightly on to the outside rails of the bed and let the kiddos enjoy your fabulous creation!!!

Please, if you have any questions let me know!
100_5528


~Lisa~

Top Mommy Blogs - Mom Blog Directory


A Law Student's journey

DIY Loft Bed Canopy

Photobucket


A Law Student's journey


I suppose a blog is a place for you to "brag" about different things... Mine must be bragging about my mediocre DIY skills, but I have to say that I'm incredibly thrilled with this project. I seriously was concerned I could not pull it off. And if I DID manage to get it done, I was sure it would look horrible. But honestly, I'm super proud of myself for this one! Once I got it hung up my face lit up like the 4th of July... I DID IT!! (and I didn't screw it up too badly, either!)

*** I totally forgot how many views A Little Girl's Dream Room - Tribute to Jaiden got!! That post was all about the plans I had for her room this year but little did I know, my body was in the process of forming little Maddox at the time I posted it! Obviously as you see here plans have changed but do still be inspired by what I am unable to do for Jaiden :) ***
100_5528


My daughter's bed is actually a bunk bed, however we assembled it without the bottom outside rail in order to make it a loft bed. It was the perfect height bed for her, the ladder is easy for her to climb, and it serves a great dual purpose as an extra bed for Maddox when he is able! It actually separates so you can make it two twins instead of a bunk. And the price was fantastic.


Ok, about the canopy. We have space issues in our house and Jaiden and Maddox are sharing a room (a post on his side later). The loft bed was a great option to help organize Jaiden's goodies that way the room doesn't look so cluttered, but I couldn't stand for it to be visible. I tossed around ideas and after some typical Pinterest hunting I found this:


Photobucket 


I fell in love! I think the site actually sells just the canopy itself, not including the bed like I have linked, but it runs $99 (in weird British money). I'm not even sure the height of the bed/canopy matches the height of mine anyway so buying it was never an option. Making it sounded way more fun!


Photobucket

Sewn window box with hot glued on flowers.
I kinda failed to take in to account the railing on the end of the bed so you see it here through the window.
Photobucket  

Photobucket
 
Photobucket
 
Photobucket

Sneak Peak of the inside:

I put Jaiden's dress-up accessories in the top drawer. Her tutus/play skirts are in the bottom drawer. 
I found that cute purse lamp at Walmart and couldn't resist it.. makes the little house glow so nicely. It makes a great nightlight as well.
Photobucket
  
Command hooks are amazing, you know, the little ones with the sticky back?! That's what I am using to hold up her dresses and boas.
Photobucket
  

Photobucket


I still have a few plans for the bed. I'd like to get Jaiden's name in the wooden letters, paint them, then attach them to the railing of her bed above the house. There are a few other little things I had in mind but I'm ecstatic about what I have accomplished thus far!


It took me approximately 4 days to complete but we have been very busy doing other housework as well, so I'd say 5hrs total of work. I bought $40 worth of material but didn't use all of it, in fact I probably used a little less that 2/3 of it. With using the flowers I had leftover from a wreath project I would estimate this project cost me about $30!


~Lisa~


Top Mommy Blogs - Mom Blog Directory


Photobucket


I MADE THIS