Showing posts with label Saving money. Show all posts

Wednesday, August 22, 2012

Rit Fabric Dye

My new favorite invention... Rit fabric dye! How cool is this stuff??!! Uhm, VERY!

I've only used it once so far and I'm thrilled with it. I can't wait to try it on some more projects, woooo!

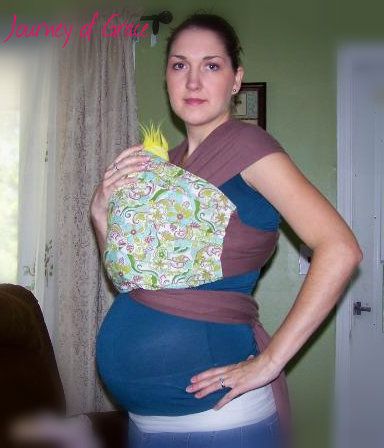
Here you'll see where I posted about different baby carriers, one of them being the DIY Moby Wrap. I had purchased 7yds of white knit fabric. Some of it was used for a white Moby and I wanted to make another one but needed a different color fabric. I chose to dye the fabric with Dark Brown Rit.

(These are photos of my Moby Wraps, one with the regular white knit and the other with the dyed fabric)
Photobucket

Photobucket

You will need:

- Fabric (preferably a white color. If you are wanting to dye a different color you need to check out a color wheel to determine what color dye to purchase to get the desired outcome. Experimenting with swatches may be necessary)

- Rit Dye of your choice (they sell it in liquid or powder form at craft stores, and places like Walmart or Target in the laundry detergent section)

- Gloves

- A spoon or long stirring item you don't care about

- If you choose to do the stove-top method, a large pot that you will never cook food in. I'm using the sink method so a pot is not really needed (except I did boil some water).

~~~~

I'm working with a ton of fabric in this project: 5yds long by about 30in wide.
  • First, especially if you are working with new fabric, wash it. I'd recommend not using any fabric softener, just regular detergent. You want to wash out the starchiness. If you add fabric softener to your washer or dryer load it will cause repelling (maybe more so over time, but just don't add it at all yet since you really want your fabric to grab the dye).
  • While your fabric is washing get your dying method ready. I used the sink method since our sink is deep, black and won't stain. I brought water to a very early boil (I just wanted water that was slightly hotter than I could get out of the faucet) in a 6qt pot and poured it over in to the plugged sink. To fill the sink up a little more I turned the faucet on hot.
** Now is a good time to glove up and put on some crummy pants along with one of your husband's undershirts because your belly is so big at 36 weeks the only shirts of your own that still fit are too nice ;) **
  • The sink method says to use 1 cup of salt and 1/2 bottle of Rit dye. I added the salt first, stirred it to dissolve then added my 1/2 bottle of dye. Stir it around for a minute so the dye mixes in with the water
Photobucket  
  • Rit recommends you add your wet fabric to the dye slowly and without folds. Oh boy. Luckily I used the washer so I don't have to wet the fabric. I just had to pull it all out and untwist it. I laid my heavy 5 yards of wet fabric on the counter and starting with one end slowly dipped the fabric in to the water making sure it went in with no folds or creases that would prevent dye from touching it evenly.
  • Once it was all in I started the tedious task of stirring around fabric for nearly 30 minutes. Being 36 weeks pregnant I pulled up a stool and set there mixing and moving and re-situating the fabric with my gloved hand. I made sure to pull out pieces every now and then to make sure it was getting dye everywhere in hopes to prevent any blotchiness in the finished product.
Photobucket  
  • After the 30 minutes (it says 30-60min.... 30 sounded just fine to me!) I drained the sink and pressed what excess water I could from the fabric. Rit says to rinse the fabric until the water runs clear. That would take literally centuries in the sink so I tossed my fabric in to a bucket and took it to the washing machine. 
  • I did 2 Delicate loads on warm both with extra rinse cycles, NO detergent. Then I did another load WITH detergent and the extra rinse cycle. This process kind of reminded me of coloring your own hair. They always tell you to rinse until the water runs clear but no matter what the next time you wash your hair the water is never clear. The first two wash cycles did a well enough job in my book even though during the 3rd cycle with detergent I still saw slight discoloration in the water.
You will need to wash your fabric separately or with like colors the next few times you decide it needs to be washed in case there is more bleeding.
Once I was done with the rinsing and washing I tossed the fabric in to the dryer. What a beautiful brown I got! I think it could have come out darker if I had either added the whole bottle of Rit or sat there for another 30min stirring it around, but I'm actually very very happy with the color!
100_5964

~Lisa~

Wednesday, July 25, 2012

From Girlish to Boyish - Travel Crib Repurpose!

Did you know?!?!
Bassinets aren't cheap! You're looking at anywhere between $70-$150+ for something your baby will sleep in for all of a few months in many cases. I was definitely not looking to spend that for our 2nd baby when I already had a perfectly good bedside sleeper/travel crib leftover from my daughter. However, it was just that... leftover from my daughter complete with the cute pink accents!
Nonetheless!! I was determined to make this work for our son!

0042

Initially I thought I'd make one big ruffled/pleated "skirt" to go all the way around the outside from top to floor. But that's a lot of fabric, and it's still not going to cover the inside edges or the bumper pads on the bassinet.
Scratch that idea.

Then I thought, what about making strips of fabric to fit each side just enough to cover the pink in length and width... but how on earth am I going to attach it to the crib? Brainstorming and internet searches were coming up empty but I was so gonna figure this out even if I had to go buy a large sewing needle and hand-stitch with thick thread!
I knew I'd be able to sew fabric on to the bumper pad so I wasn't too concerned about that part.

So here it goes...

There is truly no strategy here, I figured it out as I went so I'll show you some pictures of what I did, explain a little bit, then show you the final product. I don't expect you to drop your jaw in sheer awe because this just isn't one of those projects.

The best part about this is I haven't ruined the original product to where it can't be sold/donated later in its original condition once we are done with it. It's simply a cosmetic fix to get us through.
(hooray for seam rippers!)

Grab ya some scrap fabric (or go buy some, whichever!). I chose green and yellow from my stash.
I took a few measurements including the length and complete width, measuring from the bottom edge on the outside around to the bottom edge of the inside of the pink fabric in my case. This way once you attach the fabric it will fold over the side and cover all of the pink both inside and out of the crib.
Cut your fabric along with a seam allowance, fold in (iron if needed) and sew up the edges all the way around. You will need 2 of these pieces, 1 for each long side.
Uploaded from the Photobucket Android App

The short edges might be a little more difficult since it's rounded on top, so I laid the crib on the ground on top of the fabric and traced it. Measure how tall you need the piece to be plus a little bit of seam allowance, then cut 4 pieces to match (2 for each side).

Uploaded from the Photobucket Android App

Fold in and sew the bottom and side edges of all 4 pieces.

Uploaded from the Photobucket Android App

Sew two of the pieces, right sides together, around the top rounded part only! Don't sew the bottom or sides! Once you've done that, flip it right side out. It should now slide easily over the short rounded side of your travel crib.

Uploaded from the Photobucket Android App

~~~~

On to the bassinet bumper...

Measure the inside length all the way around your bassinet bumper. Measure the height and cut your fabric to match that including a seam allowance. Fold in and sew your seam all the way around. My fabric wasn't long enough so I did have to attach a few pieces to get the appropriate length.

Uploaded from the Photobucket Android App


 This is probably the hardest part: Sewing your bumper fabric on. Make sure you have a good strong needle (like one used for denim) and a little patience to go slow. Shoving the end of your fabric in to a corner of the bumper, sew it from top to bottom to hold it securely in place.

Uploaded from the Photobucket Android App

Uploaded from the Photobucket Android App

Uploaded from the Photobucket Android App

Now you can start sewing the fabric on to the bumper. I started on top since that edge is easiest to reach with the machine and sewed down the length of one side as close as possible to the edge of the yellow fabric while keeping it as close as possible to the binding of the bumper. In the below photo you can see the stitching that was already on the yellow fabric and how my needle is positioned slightly to the right of it.

Uploaded from the Photobucket Android App

 On the top of your long sides you are going to encounter the plastic clamps that hold the bumper to the crib. Because those boogers are sewn down in to the bumper pad you'll need to sew around this a little differently. I decided to skip over that part then go back to it after I'd sewn the rest of the top on either side of the clamps.

Uploaded from the Photobucket Android App

Alright, got all of the top sewn now except for the section around the clamp as shown above.

It was actually easier to sew this part with the clamp on the left of the presser foot which meant doing a lot of shoving of bumper fabric in the tiny spot between the presser foot and the machine lol, that was interesting, but otherwise the little screw to the right of the presser foot would not have allowed me to lift the plastic clamp up well enough sew. Trust me, I tried to work around that.

Uploaded from the Photobucket Android App

Once you've finished sewing the top of one side, go back and sew across the bottom. That will give you one side completely sewn. At the corner where you meet your new side, sew down the edge as close to the corner seam of the bumper as possible (just like you did at the very beginning). 

In the below picture you can see how it's nice and secure and ready for you to move on to the next side and sew.


I made sure to be "safe" and not sew over top of the warning label. The yellow fabric is pretty see-through so it wouldn't look very good to cover it up. I just cut the fabric and sewed the edge along the label, then picked up with reattaching the rest of the yellow on the other side of the label.

Uploaded from the Photobucket Android App

 Finish sewing all the way around your bumper, top and bottom. Since I had cut a large chunk of yellow out for the label I ended up with a bunch of leftovers at the end. All I had to do was cut it off, fold the edge under, tuck it in the corner and do the last bit of stitching.

~~~~
The final step.... we get to attach those (green, in my case) edge pieces to the crib. I don't really have any pictures of that because there isn't much to show aside from how it looks once all the pieces are on. I decided to use safety pins. It took a little patience and finagling to get them on there and secure.

I'm not concerned about the baby getting to the pins because once the bumper is on they are covered up from the inside, and the crib will be put away long before he will ever walk or be able to mess with it.

Since the crib is wedged between my bed and the wall I opted not to mess with the cute pink skirt on the bottom aside from pinning it back on the one side that is visible. 

100_5905

For now I covered the mattress pad with the blanket that came with our crib bedding set. I will either buy or make a matching sheet to cover the pad eventually.

100_5906

***I would not recommend doing this with a full-size Pack n' Play unless you plan to sew on ALL of the fabric you add like I mentioned in the beginning. In general you've got the older babies in these and the safety pins can be a hazard!! This mini travel crib can be used like a Pack n' Play by removing the bassinet... if an older baby that can stand and reach the added fabric is put in it, you need to remove the fabric and safety pins.***

Overall this was a pretty simple project and with using leftover fabric from my stash it really didn't cost me a penny! I'm very happy with not having to go spend $100 on a new bassinet. I hope this will encourage and inspire you to save a little bit of money and consider repurposing!!


Friday, July 20, 2012

Personalized & Reusable Goodie Bags!

For my daughter's 4th birthday I decided to go a little outside the "normal" box of party stuff and rather than buy plastic bags and stuff them with goodies I opted to make my own bags. I went with the idea of giving each kid a reusable "snack bag" that is personalized with their initials!

Here is the original tutorial I found on Pinterest:

The girls got either pink or purple, and the boys got either green or brown. The embroidery, if you choose to do something similar, needs to be done once you attach your outside and inside fabric squares (pretty much after the first step that involves sewing). 

 I am not a master embroiderer... it's still fairly new to me even though I've had my machine a couple years (Brother SE400). I just don't embroider often. If you follow your machine instructions it recommends you to use embroidery thread but that stuff can be very pricy. I use regular machine-grade thread for mine.

Once you get your pieces embroidered you can move on and follow the steps in the tutorial accordingly to get your finished product.

Photobucket

Goodie bags labeled and ready to hand out at the party!
 
Photobucket

 They were are a HUGE hit! The kids loved them according to feedback from parents! I will definitely consider doing something similar again next year.

Oh, and for the cost?? About $3! 
All I had to purchase was some off-brand sew on Velcro from Walmart. Everything else was fabric I had on hand which coincidentally was all given to me by either my grandmother or my sister.

~Lisa~

Tuesday, June 26, 2012

Adventures in Homemade Laundry Soap!

I've been making my own laundry detergent for about 3 years now. I love it! Only twice in that 3 years have I messed up timing of making more vs. running out and had to go buy stuff from the store >_<  I hate that! I'm all about saving money here and buying detergent is a waste, not a save!

I use the Duggar Family recipe for liquid laundry soap with Fels-Naptha bar soap (found mine at Kroger). I won't go through every single step since Michelle has basically laid it out for you, but here's my pictorial post about it.

Aside from the ingredients listed in the recipe you'll need a few extra things, one being a 5 gallon bucket. It has been a while but I believe I paid $4-$5 for mine at Walmart. I learned this go 'round that my bucket had a crack in the bottom so I patched it with a pool repair kit I had handy (remember, I'm saving money!). To be safe I put a couple garbage bags in the bucket when I began to fill it up. Later I learned the bags had leaked but thankfully the bucket and my patch had not!

Uploaded from the Photobucket Android App

Uploaded from the Photobucket Android App

I recommend a blender or food processor (I used my Ninja) for grating the soap. Faster and better than using the cheese grater, IMO. Also have a large funnel and ladle on hand for when you begin to fill up your smaller containers.

Photobucket

  Here is what the soap looks like after it sets for 24hrs. It definitely takes on a creepy goo form!

Photobucket

I use all different sorts of containers to store the soap. These are glass jugs from Santa Cruz organic apple juice.

Photobucket

Where the funnel and ladle come in handy!

Photobucket

  I am trying something new here... I decided to fill the lid of my Tide Stain Release bottle and dump it in one of my laundry detergent bottles. Yes, I make my own laundry detergent to save money but I still buy Tide Stain Release. But you better believe I buy that stuff on sale with coupons. I probably pay less $2 a bottle. Personally I really like it. Anyway, I usually only add the Tide to my laundry loads with clothes that I know have some stained items. With a 4yr old that's about every load of clothes. I'm going to test this out and see if it works just as well as adding the Stain Release separately. (BTW I do not use the recommended amount per the Tide bottle in each load, that's just outrageous. I use maybe 1/3 of what they suggest and have had good luck with it.)

Tideless detergent on the left - Tidefull detergent on the right

Photobucket

 And here you have it... every bottle I could find filled with detergent!

Photobucket
 
I still have about 4 inches of soap left in the 5 gallon bucket to distribute in to containers once it empties.The cost is incredibly minimal. I used my last bar of soap this time but I still have the same boxes of Washing Soda and Borax (down to maybe 1/2 full) that I had when I first started making detergent. I believe this is my 4th batch in 3 years? It must only cost a penny per load, if that!

~Lisa~

Saturday, June 23, 2012

Sewing To-Do List

We are a couple of days in to the 3rd trimester chugging right along! 

IMG_20120622_135935  

July is my busy calendar month and August is my planned prep-for-baby month. While writing it down I realized there's quite a bit to do in the sewing department for Maddox, so I want to make a list not only to help ME out, but maybe to help other mommas out who may be interested in making some baby & momma goodies!

1.) Make a personalized onsie for a Onsie Exchange in my September due date Facebook group!  DONE!!

**Infant Tulle Tutu**

I've been given a few tidbits of information about my randomly picked person so that I can try and create something for her baby that will be special! I'm excited about this. I put this first because I have to have it shipped by August 6th, so I really need to start working on it SOON! Just in case my person happens to read my blog I won't give ideas away yet, but I definitely plan to post the final product once she receives it!

2.) Cloth diaper inserts DONE!


I still have a lot to make. I need to do plain ol' microfiber for my pocket diapers, more fleece/microfiber, possibly Bamboo fleece, and even recently learned that minky is a great material used for inserts. You can check out the inserts I have already made HERE!

3.) Cloth diaper wet bag DONE! (still need to create and link a post)


I guess I could buy one, and I know people have said they use just a gallon baggie but I really wanna take a stab at making my own wet bag. HERE is a link to one by Little Birdie Secrets that has given me some great tips to get started!

4.) Hooded bath towels

I may succeed (or fail) at only making one, or I may enjoy doing it and end up making a whole slew... who knows with me! Every project is so different I just never know if I'll like doing it or not until I do it. HERE is my inspiration from Blissful Sewing. She has a PDF file for specifically a hooded blanket, but if you change up the material, you have a bath towel :)

5.) Baby wipes DONE! (still need to create and link post)

Since we are cloth diapering, why not do cloth wipes? It can't possibly make too much of an impact on the laundry we'll already be doing, and it'll definitely make even less of an impact on the environment.  have found a few tutorials during my research. Many suggest using old knit t-shirts cut up. I totally have a stash of those in my sewing room. Check!! Flannel makes another great wipes material (check out THIS cute tutorial by Sewing Much 2 Luv). I've also seen folks make them with terry cloth.

6.) Moby wrap DONE!

**Moby Wraps & Ring Sling!**

I have wanted one of these since I found the tutorial last year during our 2nd pregnancy. It looks so cool and simple! I just can't bear the thought of paying $45-$60 on the real deal when I can so easily buy the fabric on sale and do it myself, then if I don't like it... oh well, lots of knit fabric for other projects! A Load of Craft has 2 wonderful tutorials (HERE is one of them) plus videos to help you learn how to properly wrap it with baby!

7.) Big Sister/Little Brother shirt and onesie for Jaiden and Maddox

These are so popular on Pinterest and a billion people on Etsy make them, so to be the rebellious and frugal momma I am, I will so make these and make them rock! Ok, I HOPE I will make them and make them rock. I hope.... :p

8.) Car seat blanket cover

Maddox will be here mid September so around that time we can expect the weather to be in its changing period. It's hard to predict around here but either way we'll have a new baby in the warm AND cold months so I want to do what I can to help protect little guy from the elements. Workman Family has THIS tutorial to get me headed in the right direction!

Ooo, on to Mommy things now!!

9.) Delivery gown DONE! (I simply took this Target clearance maternity dress, lopped off the length just above the knee and hemmed the bottom edges... still need to create that link!)

Mr. Maddox will probably be the last baby for us. Lord knows I love being pregnant and wish I could raise a huge family, but my husband and I have agreed that 2 is where we stop (until years down the road when I'm itching to get pregnant again.. I can already see it lol) My daughter was a voluntary induction with a few hours laid up in the hospital bed, then an epidural, about an hour of pushing and voila! It was beautiful, absolutely would not trade it for anything in the world... but this time I would like to experience labor come on naturally, walk around and work my way through it, scream bloody murder because I refused an epidural, and have a baby that I feel nearly killed me in the birthing process. Instead of looking like a hospital patient in the ugly drapes they provide, why not look like a hospital...not-patient-in-ugly-drapes?! Yeaaaah... That being said, I have decided that I would like to make myself a comfortable and cute delivery gown. Now, my luck things will go the exact opposite or happen so quickly I'll never get to wear it, but I still wanna make it :) 

HERE is one idea by Pretty Pushers of what style to make. I have seen different styles sold on Etsy that literally look like a hospital gown but obviously much more cute and customized, wrap skirts, long maxi-like dresses and such. I'm still not 100% sure what style I will do... it depends on what I have in-stock or what I find in-store for cheap that I can alter.

10.) Nursing pads

My hope is to have a successful nursing relationship with my son just as I did with my daughter (although she and I struggled a bit at first). I have a decent stash of the disposable nursing pads, a nursing necessity, in my hall closet I purchased with last year's Flex Spending Account funds. There are probably between 4 and 5 months worth. Mostly Lansinoh, my favorite brand, and I believe a couple boxes of Medela brand which I have never tried. But of course as my trend seems to be around here, I want to see if I can make some reusable cloth nursing pads and make them work! With a little determination and a sewing machine you can search "nursing pads" on Etsy and get fabulous ideas on how to make your own. I'm still doing my research on these... so many fabrics to use and shapes to work with!

I believe that covers it for now. Maybe I have inspired you to try making some of these on your own?! Or maybe I've reminded you of things you'd like to make and subsequently your baby prep to-do list has increased and you want to strangle me... either way! 

~Lisa~

Thursday, June 21, 2012

Clearance Maternity Dress Conversion

About 3 years ago I needed to purchase an outfit to wear at Thanksgiving. The cutest thing I could find was a maternity dress at Target. My daughter was a year old at this point so maternity wasn't a very accurate term for me, but it fit and best of all?! I paid like $11 for it!

Thanksgiving044

You can tell it slightly droops in the front to make up for preggo ladies and their cute bellies. I have worn it occasionally since I purchased it but with the long sleeves, even though they are sheer, it made it difficult to wear during the hotter months. The whole dress is a sheer material with a black slip underneath to cover the important parts. 

Today while going through my closet I found it shoved way back in the back and thought how I'd love to wear it now that I'm actually pregnant, but ugh the sleeves! Duh, I own a sewing machine and a pair of scissors so surely I can fix it. I took about 10 minutes of time, cut the sleeves off leaving about 1/2 in of fabric to fold under for a clean edge, then sewed all the way around the arm holes to get a super cute summer sleeveless maternity dress!

My husband was still at work so I had to set up the tripod and get these pictures. I feel as if I have some sort of smirk on my face?? I promise I'm happy though!

100_5687


Then my little girl had to join me... 
100_5688


Have to say I think it looks much much better on the intended consumer (someone who is actually pregnant) AND sleeveless!


~Lisa~

Friday, June 1, 2012

Traveling with Dogs: Tips for the trip!

I'm not a trip-taking pro but I thought I'd take a stab at helping folks prep for a long trip with a dog. I'm not going by some professional's tips, this is just what I figured out for our first ever road-trip with our 3yr old Labrador Retriever, Neha.

Over Memorial Day weekend we visited my Dad and his girlfriend at their lake house which is about 8 hours from where we live.

We have a Town & Country minivan so for now space is not really an issue with a 3-person family. We stowed away the back seats as well as the unused Captain's seat behind the driver to give us enough space since we'd have an extra "passenger" this time.


Photobucket  
My big baby girl and I on the dock, our last day at the lake.
(She was not leashed most of the time on the lake but this was our last day and I didn't really want a wet dog in the van when we left later)

Here is my list of things + tips you may need for your trip!

- Make a list of extras:
        ~ Before you leave make a list of everything you know for sure you'll need or would like to have with you for the dog. Start the list about a week or so before you pack that way you can jot things down as you use them or remember them. I grabbed a few extra toys and her shampoo/conditioner since we were going to a lake.


- Potty breaks:
        ~ Please make sure you get your dog to pee & poop before you get on the road!! We got Neha to pee at the house before hopping in the van (early morning) but she wouldn't poop. She was overly excited about going with us. When we stopped for gas before we got on the interstate I took her out and let her try again and she had a successful BM. That eased my fears about van poop accidents (it's happened to me before and it smells absolutely awful!)
        ~ Since I am 6 months pregnant potty breaks were not really an issue in terms of remembering to stop. We were stopping every couple hours as it was so maybe every other stop we would let Neha out to try. 

-  Kennel, crate, or barrier:
        ~ We have a large wire crate we use for her in the house (kinda like this). Plenty of room for her and she is a very large in height Lab. This was a MUST to take with us. She is not a very mellow car dog especially if she has space to move, plus we don't want her trampling all over. The kennel was placed front-facing behind the driver's seat to where we could open the kennel door and she could easily hop out the passenger sliding door rather than it sit in the back of the van and have to be accessed by the back gate where shifted belongings could fall out upon opening.
        ~ Depending on your vehicle and situation you can also use one of those metal car barriers. A lot of people with cars or SUVs use these to allow your dog to roam free in the back but keep them from coming up front. 

- Comfort:
        ~ Make sure you have a good comfy blanket for furry friends to lay on... they'll be in there for a good duration even with potty breaks so you want them to be comfy.
        ~ Your dog's favorite chew toy or something they enjoy that will occupy their time may be handy. We gave our dog a rawhide bone which she normally loves to chew on for hours on end but honestly she didn't touch it this trip at all. It was so different for her I think it threw her off, but we were prepared JIC!

- Kennel cover: 
        ~I put a large sheet over her kennel leaving the front exposed so that hair didn't escape everywhere and also to help keep her calm by minimizing distractions that she would otherwise be able to see. Also, if you have a shedder like we do, lay a sheet down underneath the kennel and anywhere your dog may trek when exited the vehicle.

- Jug of water (ab $.89 or so) & a dog bowl: 
        ~ The water jug came in super handy along with our "travel" bowl that's made out of waterproof fabric. We made sure to offer a little water at each stop and if any was left over we just put it in the kennel with her. If anything spilled it just got on the comforter she slept on, no biggy!

- Dog food, of course:
        ~ Make sure you have enough accessible during the trip if your traveling runs in to a regular feeding time, but also make sure you have plenty for while you're at your destination, unless you'd just rather buy some when you get there. I placed dog food in a couple gallon Hefty bags. You can also now buy 2.5 gallon Hefty bags. Or you can use a small plastic container with a lid... whatever you have handy.
        ~ We don't do treats, she usually gets leftover fruit, but if you do treats, don't forget those!

- Leash: 
        ~ Unleashed animals are a no-no in my opinion when it comes to public places. You never ever know their temperament especially in a new place and you never know how well they will listen to a return command. We took with us a 15ft long leash with no retraction or anything. It was something I purchased as part of her obedience training. Leashes with length can give you a good opportunity to let them explore a little more than you may be willing to walk when you stop for potty breaks. We also took a regular 6ft leather leash.

- Medication:
        ~ Obviously you don't want to leave any medication your dog regularly takes behind so be sure to grab that. If your pup has high anxiety in the car check with your vet about something you can give to relax them. We were going to go the Benadryl route (check with your vet on proper dosage!) but opted not to since I had none in the house. I figured if we needed it we'd buy it but we didn't so we saved money!

- Air Freshener:
        ~ Yes, I'm serious. We could have used it a couple times. Our poor girl had a few nervous stinky farts on the trip down and it meant rolling down windows at 75MPH to air out the van. A little air freshener would have been nice. Not to mention her breath was stinky and she had periods where she would breathe very heavily and we could smell it, Blech!

Photobucket 
 Neha and my husband on Neha's first ever boat ride.

Ultimately my biggest tip is don't spend money you don't have to! If, once you get to your destination, you realize there is something that you just have to have that you didn't have at home to bring with, then get it, but otherwise save the money for your vacation. Your dog surely won't die as long as you at least have food and water for them but some of the above listed things will help make it more comfortable for them (and you) if you are able.

There was nothing I didn't list that I thought "Shoulda brought the whatchamacallit!" so for most people, I think this should suffice and cover pretty much all bases!

~Lisa~


Top Mommy Blogs - Mom Blog Directory

Wednesday, May 16, 2012

Trend Lab Diaper - DIY Pocket

Once again, I do not yet have a baby to put my cloth diaper stash on but I'm trying to prepare myself as best as possible. Recently I purchased a Trend Lab brand diaper from a local store. I hear mixed reviews about them but it was only $12 and it can't possibly hurt to have one. Who knows, I may love it.

Anyway, Trend Lab diapers come with a microfiber snap-in insert. The diaper has no pocket for the insert. Unfortunately for that, microfiber is a material that many people advise NOT to put against baby's skin. Some people claim to have no issues but it seems the majority say it causes rashes and is too rough for the tiny precious bum. I'm going to be in the "better safe than sorry" crowd here and decide that microfiber will not be against my kiddo's raw hiney so I needed to come up with a solution

Here's my TL diaper.
Uploaded from the Photobucket Android App
 One option I had was to create a cover for the insert. In general the Trend Lab diapers are already going to be quite plush (especially when snapped down for a younger baby) since it's a one-size and the insert is pretty large and fairly thick (not a bad thing necessarily) I was afraid creating a cover for it would make it way too thick and possibly mess with the gussets and cause leaks. Maybe not, but oh well.

I opted, instead, the cut the polyester fleece lining in the diaper to create my own pocket to slide the insert in to! I had read a few reviews of people taking this route and having no complaints about the functionality of the diaper afterward.

So I laid the insert inside the diaper and marked where I wanted to cut the slit and how wide to cut it. I made the slit on the end with the button snap (front of the diaper). 

Since the fleece is pretty stretchy and thin I decided to zig zag stitch up the edges so the slit wouldn't rip further and the raw edges wouldn't roll up like they were doing once I cut it.
Uploaded from the Photobucket Android App
Here it is with the insert tucked in the pocket and snapped on to the diaper! 
 Uploaded from the Photobucket Android App
Voila! Simple as that!
Hopefully that helps some of the unsuspected Trend Lab diaper buyers out there, or maybe it'll change your mind about their product and give you a reason to buy a few more.

~Lisa~ 

Top Mommy Blogs - Mom Blog Directory


I MADE THIS

DIY Cloth Diaper Inserts - Part I

Check out Part II for making regular microfiber inserts!

DIY Cloth DIaper Inserts - Part II (Microfriber!)
UPDATE: See Cloth Diaper Follow-Up for a recent review!

I have to forewarn you that I do not have a baby to try them out on (yet)
These inserts should work just fine for any pocket diaper also. You will need to adjust the size accordingly.

I have done a descent amount of recearch lately trying to figure out what will make good CD inserts for my gDiapers. Most of what I'm reading advises to use a polyester (or more pricey bamboo) fleece outer layer with a microfiber or hemp inner layer. Really any fabric that has a good absorbency is what you're looking for in an inner. The outer layer is to help wick away moisture from baby's sweet tush so that's where polyester fleece comes in handy. I have also heard of people using flannel as the outer layer. If you hunt around on websites that sell inserts just pay attention to what they say they are made out of. If it works well enough for them to sell, it should work well enough for you to make!


What you need:

Outer Layer:
                   ~ Polyester fleece - I purchased 2yds (cream color) since it was on sale, ab $12
          OR   ~ Suede cloth - This will also work as an outer layer. It's very soft! Some people simply make little suede cloth 'socks' to slide the microfiber in and out of.
         OR  ~ Flannel - I did purchase flannel later down the road to test out as you will see. I paid $7 and change for 2 1/4yds. I have read some sites sell flannel inserts (6-8 layers of only flannel) I guess as "extras" to stack on top of other inserts for naps or when baby may not get a changed diaper for a while.

Inner Layer:
           ~ Microfiber - I purchased a 15pk of towels from Walmart for $10. They are thicker than some of the other ones they had. If you cut it right, you can get 4 (small size) pieces per towel.
Uploaded from the Photobucket Android App
Heads up: Microfiber makes a huge mess when you cut it especially with these thicker towels.. you'll have little fiber pieces floating around everywhere! The rotary cutter comes in super handy here with helping to contain the mess.
~ Sewing machine and/or Serger
~ Scissors or rotary mat
~ Straight pins - I use the kind with the little glass heads on them.
~ Pattern or measurements - I used the size small gDiaper cloth inserts (before they were washed) to get a good measurement.

I did not pre-wash any of my material. It's not necessary. I preferred to wash my inserts once they were all put together. I felt like the fleece would stretch unnecessarily if I pre-washed it.

gDiaper insert measurements:

The measurement for a small size is about  4 1/2 - 5inches X 11 1/2 inches. I didn't write it down so I'm measuring the one I made... next time I'll write these things down!

According to my friend who has a baby in size Medium diapers her inserts measure 5 1/2 X 13 inches. These are the same size inserts for the Large/Extra Large gDiapers.

Start Cutting:

In my first insert I cut out the microfiber about 1/4 to a 1/2in smaller all the way around than the measurements. I wanted the inserts to be tucked inside the fleece. So the fleece got cut to the above measurements for the small size. This is no exact science so don't fret about your measurements.

Uploaded from the Photobucket Android App

Layering:

I laid 2 layers of microfiber inside the two layers of fleece and pinned them together. Watch your fleece closely. You can tell by looking at it which side is the wrong side (you can see the lines where the fibers are worked together). You'll want that facing the microfiber so the "right" side of the fleece is facing baby's tush.

Stitching:

About 1/4 inch in from the edge of the fleece do a straight stitch all the way around (you can see that in the finished product below... and I did way more than 1/4 on my first insert lol). Make sure you are straight stitching through ALL layers and not just the fleece.

Once you have it straight stitched all the way around, trim up the outer edges to even them out (I did not do this on my first insert).

Now you will want to do a zig zag stitch (or if you have a serger, serge!) all the way around the outside edges. Try your best to make sure the outside of the zig zag goes off the fabric so it seals up the edges, just like a serger does. Do this around the entire insert. 

Again, not an exact science and if you're like me and can't sew straight to save your life, don't worry. It'll work either way but the closer to the edge the better.

I used this particular zig zag that does a little bit of straight stitch also (the highlighted one on the far right). I figured it would be a better hold. Later on I ended up going with the regular zig-zag, it's the far left stitch on my machine that is partially cut off. Regular zig zag moves a lot faster and is a tighter stitch.
Uploaded from the Photobucket Android App


Here is the finished product of my second ever handmade insert. This was done with regular scissors and rounded edges. It is also not washed yet as you see it here.
Uploaded from the Photobucket Android App

 I made two inserts initially. One of them I did not do the straight stitch around, just the zig zag, so it looks kind of sloppy IMO especially after having been washed. It'll work but luckily I feel I have improved my technique a lot now that I have made about 15 of them.

More Photos & Info:

My insert (bottom) VS gDiaper insert (top)
You can't tell here but they are pretty much the same thickness.
 Uploaded from the Photobucket Android App

Left: gDiaper insert in small gDiaper
VS
Right: My insert in small gDiaper
Perfect fit!
Uploaded from the Photobucket Android AppUploaded from the Photobucket Android App
 Changing it up, more layers and different fabrics:

I have since made a few inserts with 3 layers of microfiber with fleece outer layers to help with extra absorbency and some with 2 layers microfiber sandwiched between 2 layers of flannel on top and bottom (4 total flannel layers).

With this batch I finally went out and bought a rotary mat and cutter. Ooooh how did I go so long without one?! I was intimidated by the Olfa brand that is so incredibly expensive at craft stores but Walmart actually sells a self-healing mat for about $14 and a cutter for about $13. I don't *like* to spend money like that but I really know this will come in so incredibly handy, and already has!

I basically made this last bunch with all the material the same size so you will see the microfiber peaking out the sides. I highly doubt that will be an issue. Some of it will probably even wash off if it's loose fibers. 
 Left: 2 microfiber layers btw fleece
Right: 3 microfiber layers btw fleece

Flannel (2 top and 2 bottom layers) with 2 microfiber layers in the middle.
Photobucket

Some of my (small size) fleece/microfiber inserts.
Photobucket

Approximate Cost:

I have yet to use all of the microfiber (have about 4 towels left) and have also not used all of my fleece or flannel (maybe a bit more than half the fleece left and 3/4 if not more of the flannel left). My estimate so far is that these inserts are costing me about $.50 cents to make. Once I've used all the fabric I'll have a better idea of the cost per unit!

Washing & Prep:

I went by the gDiaper insert instructions on prepping my inserts, but also took advice from other brands. Initial washing and prep is pretty easy, just time consuming. They recommend to wash the inserts approximately 3 times before first use in HOT water with NO detergent and NO fabric softeners.

***I am editing this slightly because as I do more research I'm hearing that polyester fleece and/or microfiber does not have to be prep washed multiple times, that just once in hot water will do. I believe the additional washes come with fabrics like the bamboo or hemp (which is probably why gDiaper inserts are recommended to be washed multiple times).

Tumble dry LOW with NO fabric sheets (I had to take my Downy dryer bar out).

They should be good to go after that!

Soon I hope to give everyone a good review of how well they work compared to the regular gDiaper inserts, but based on everything I have read and the few tutorials I have come across nobody seems to be complaining that they don't work!

~Lisa~

Top Mommy Blogs - Mom Blog Directory


I MADE THIS