Tuesday, July 26, 2011

Cube organizer on the wall - Laundry closet redo


Photobucket

Photobucket

I looked almost everywhere for a blog, website, tutorial, anything that would prove I could put my cube organizer on the wall... No luck. 

Obviously I didn't let it stop me, muwahaha!

I really needed to find a new home for it. Recently I got a bedroom set that once belonged to my Mamaw. The armoire wouldn't fit in Jaiden's room with the rest of the pieces so I decided to put it in the extra room. That meant the shelf had to go.

It sat for a couple of days until I decided I would go ahead and completely reorganize my laundry closet and find a way to get that sucker on the wall!


Photobucket


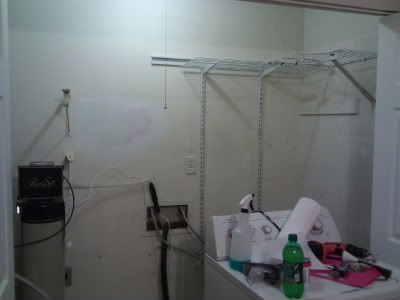
Yeaaahh, that's my nasty laundry closet. Of course at this point it has been emptied out. Before this it was a disorganized mess so believe it or not I did spare you some pain.


It took me about a day and a half total to finish it up. I had to putty old holes, clean up all the dust and lint, and paint. (Thank you to my friend Judy for selling me an entire unopened can of great quality paint for cheap!) Then I had to hang up the cube shelf. 
That was hilarious and I never want to do it on my own ever again.


Photobucket

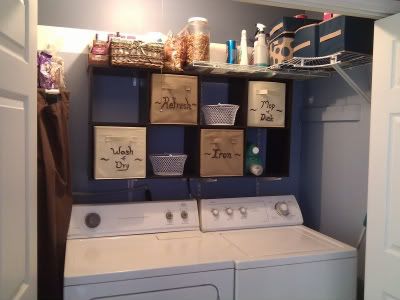
I'm not 100% confident in the bracing of this shelf. I think my stud finder is out to kill me. Had much better luck knocking on the wall looking for studs after I had already screwed a gazillion holes everywhere. Argh! So only a few of the brackets are actually in studs. 

The rest of the weight is supported by a lot of prayers and the arms of the wall shelf that was already there!

A little tugging on it did seem to prove fairly safe :\

Photobucket

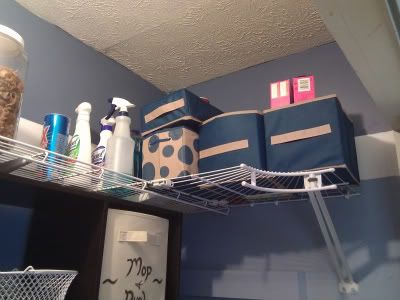
This is to the left of the dryer. There are two shelves. The top shelf reusable bags, my Hefty & Ziploc bag collection, as well as some bread for now. The bottom shelfs holds all of my paint cans. 

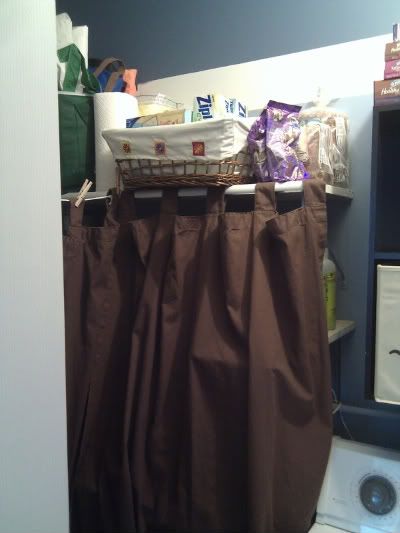
After I got everything in there I realized it needed to be covered. It just looked so cluttered. There is a water softener system and water heater back there.  
(I used hooks screwed in to the top shelf and a leftover piece of quarter round, of all things, to fit across as a make-shift curtain rod.)

Photobucket

Just some Dollar Tree fabric cubes I used to organize little things.

Now instead of having junk piled on top of the washer and dryer making it more difficult and annoying to do laundry, I have everything organized with a home and it only cost me about $30 for the paint, Dollar Tree cubes, and wall brackets!!


Be Inspired!

#2 Most viewed post of 2011
2011 In Review - 2012 So Much To Do!
Linked:

Photobucket

Thursday, July 21, 2011

The Wise Woman

Photobucket
My handsome husband & I 
September 2010
Last September my husband and I joined our new church after about a month or two of attending. It truly has been an incredible blessing to our family, our spiritual growth, and our spiritual strength! We hit a rough patch in our lives and our marriage last year before we joined that was a complete eye opener. (It was important for us to get right with God before we committed to joining a church and the whole situation was a testimony to how God's timing is always the right timing!) I'm not going to share every little story or problem we encountered, it's a private thing and we all should keep our private lives private, but please heed my advice. I do give it with love and a little smidgen of experience! What I will say is it's simply amazing how disobeying the Lord can tear you apart piece by piece while simultaneously tearing apart your home. Proverbs 14:1 tells us "Every wise woman buildeth her house: but the foolish plucketh it down with her hands." I was doing just that; foolishly, selfishly plucking my house down one brick at a time, letting the devil sneak right through the threshold of my front door to freely roam.

I am a true believer that a wife should reverence her husband, build him up, and show him you love him, always. Not easy to hear when WE THINK he's being less than perfect, not helping around the house, or working too much. I'm speaking from experience when I say criticism (even if you think it is constructive) and a bad attitude (even if it is not his fault.. just you having a lot of bad days) can and will slowly bring your husband down to a whittled twig that you casually and unknowingly step on during your daily walk. I'm not saying don't have a bad day. Your husband should be there for you on your bad days, but don't drag it out. It won't happen over night but give it 6 months, a year, 10 years. Eventually he will grow tired of your lack of respect and foolishness. Tell him you love him every day he walks in the door. Give him a hug and a kiss whenever you get the chance. Don't complain around him about anything that he has done wrong or failed to do. Focus on all the positive attributes, even if only a few, instead of the negative.... And watch him flourish knowing his wife loves him!!

When I look back on what is written above I can't help but think of my Mamaw, Daisy. What a beautiful example of a virtuous woman. I wasn't very proficient on Bible knowledge growing up but she was the light of my Papaw's life, and he hers. I never heard my Mamaw say an ill word to my Papaw. She always had a smile on her face and you could see the love they had shared for years was blossoming even in their frail and old age. When Mamaw passed away in May 2011, a year and a half after my Papaw passed, the preacher at her funeral said "If I could sum up the life of Sister Daisy it would be this verse.. "Who can find a virtuous woman? for her price is far above rubies." (Prov 31:10) He was so right. She was the most humble and virtuous woman I had ever known. An amazing example of a woman who merely wanted to please her Lord by pleasing her husband.

Photobucket
Mamaw and I at my wedding, September 9, 2006

In 2010 after joining our church my husband and I attended the annual Couple's Retreat hosted by Shawnee Baptist Church at their beautiful Indian Creek Baptist Camp, a ministry of the church. We made it a very serious and necessary point to go to the retreat. It was important to our marriage that we surround ourselves with Christian couples in an environment that would focus on marriage. What an incredible, and I mean IN-CRED-I-BLE blessing it was to us! During one sermon the preacher went verse by verse through 1 Corinthians 13, telling us about charity (Christian love). Here is a short post I published that has the verses listed for quick reference if you wish: How do you describe love...

There was a period during the first evening that the ladies and men got separated so the preacher's wife could speak to us, and the preacher speak to the men. That was a wonderful blessing also (speaking from my experience... hubby said he thoroughly enjoyed the men's part but I can't speak too much for him)... Just to hear her personal story and her wisdom and advice on how we can be better wives... could not have asked for more!

What I loved from last year was when I looked around, I knew that all of the couples have experienced a little, or even a lot, of turbulence. We have endured struggles of all sorts, arguments, fights, maybe separations, some even divorces, remarriages, learning to raise our children, not being able to have children... the list just goes on. What made it just a joyous fellowship was knowing that we were all children of God, saved by His grace and forgiven of our sins. What better way to spend two days out of your year, completely surrounded by Godly people who want nothing more than to please Him, and what better place to let it start than with our marriage. 

 
I just want to be a blessing to ladies around me. I'm young and learning my way through life and still have a lot to learn ahead of me. I am so thankful for the Christian ladies who have inspired me through their blogs, speakings, and even the ones who inspire me visually through their mannerisms and modesty.

Photobucket
Couple's Retreat - October 2010


I'm praying you will Be Inspired!

Wednesday, July 20, 2011

DIY Spool Rack!

I feel like I'm on some sort of creative roll, and I have no clue where I got it from. I take that back, yes I do! I suppose the Good Lord sees how frustrating my old ways of organizing and decorating are to me so he has given me a nudge in the right direction. I am very thankful for it. It needs to be done, plus I'm having a blast with it!

This week I started work on a spool rack. 
Photobucket

Since it is my sewing room I have to have a place to store thread spools.  
Originally I had them in a tiny drawer and that got old way fast especially when I ran out of room. Then I bought wood craft boards that I wrapped with quilt batting and brown fabric, then hammered nails in to at an angle. My goal was to wall mount it. That project failed because I bought nails that were too short so the larger spools slid off :(

I wanted to do this project at ZERO cost to me, using materials I already had.

Thank you, previous homeowners, for leaving behind this ugly wall hook rack for me to keep hung in the same place for nearly 2 years before realizing how hideous it was and making it over for a beautiful new purpose!

I can't find any better pictures of the before product. You get the idea though... the other half isn't hiding any surprises. Trust me.
Photobucket

After a little hunting around and brainstorming I decided to use a box of corsage pins I had as the hooks for my thread spools. I hammered them in just enough to hold the spools. Then I hung the rack on the wall along with an old "Trust In The Lord" sign my MIL gave us a few years ago. 
It was pretty ugly before I painted it which explains why it sat in a closet for a long time.

 I took the old brackets off the top that allowed the shelf to hang horizontally and moved them to the side so it would hang vertically. I also had to create a way for the sign to hang since the old method was with a metal wire hot glued to the back that was in bad shape, so I nailed brown ribbon to it. I'm not too terribly pleased with the way that part looks but I'll fix it one day when a new idea comes to mind. 

Here is a close-up to give a better idea of how the pins serve their purpose. On smaller spools I can keep the bobbin with it, otherwise I just stack the bobbins up on another pin. It also worked great for my tiny stash of ribbon!

Photobucket

As always,
Be Inspired!

#6 Most viewed post of 2011
2011 In Review - 2012 So Much To Do! 

Saturday, July 16, 2011

Desk/Vanity Redo

THIS excites me!!! 

I have been itching to redo of a piece of furniture (paint-wise) for a while. 

I finally did it!!

Last year I got a desk from my mom. 
Well, really it was from my aunt and uncle but my mom came by the house with a big desk in the back of her truck.

I told her she surely did not need any more furniture in her little house so convinced her to let me have it. Since then it has served a convenient purpose in my extra room, especially when I got my sewing machine in December. 

Can't beat FREE!!

Photobucket


In September of last year I also decided to go buy a vanity (or anything I could find that would work) to use as a vanity table. I have Plantar Fasciitis so standing in the bathroom for an extended period of time to do my hair/make-up was very hard on my feet. I found the perfect little desk with all kinds of beautiful potential... I think I paid $25-$30 for it.

Photobucket


I'm slowly in the process of trying to put our house together and I really wanted to get my sewing room set up the way I want it. That involved moving my vanity from my bedroom to the sewing room. After standing back and looking, everything was so mismatched and it drove me crazy!! Sooo... a little hunting around online and I decided to repaint the desk and vanity to match so I could get the ball rolling on the decor process.

My Inspiration: 

After a little color debate I settled for pink and white 

...and this is what I got...


Photobucket


I decorated it with perfumes and pretties my mom gave me that she inherited from my recently passed Mamaw. I think they made a beautiful addition.

Forgot about the white mirror I had tucked away.. PERFECT fit!
I was using a big square brown-framed one from Kirkland's. Got this white mirror off Craigslist last year originally for my bathroom whenever we redid it. Still have not redone it...


Photobucket


I LOVE the new knobs I bought for it! They are like a pewter color... $5 for all of those brand new!! 
(at a local store that sells stuff they buy by the truck loads from department stores and such.)


Photobucket

In the finished product I got rid of the shelf that was in the top right corner, and the shelf on the bottom right, as well as a roll-out keyboard tray that was attached under the desk.

I'm definitely thrilled at the results!!

I won't get in to too many details about how I did everything. It's pretty simple. Sanding and painting. 

A couple notes: I do not recommend spray paint for this. I used it at first and had to go out and buy a paint+primer in one paint to finish the project. I only used the spray paint ultimately for the metal legs on the desk as well as the black rubber-like strip that went around the outer edge of the desk. It was the only way I knew to make it white. Give that stuff plenty of time to dry! It took nearly 2 days for it to not be tacky to the touch any longer. Rubber is not easy to paint apparently!


In total, this project cost maybe $30 for the stencil, paint, and hardware. 

Be Inspired!

#1 Most viewed project of 2011!!
2011 In Review - 2012 So Much To Do! 

Saturday, July 9, 2011

Home Improvement: Kitchen Finished Result

I just realized I never came back and posted the finished results of our kitchen makeover! 

I won't go in to much detail about what I did since I spotlighted most of the plans in the Home Improvement post, so here are finished photos for you to enjoy! Hubby and I did almost everything on our own except cutting and installing the counter tops, and the rewiring of the dishwasher. 

What you see when you enter the kitchen:

Photobucket

Sink area... new dishwasher and freshly painted cabinets with new hardware!

Photobucket

New sink and faucet:

Photobucket
Photobucket

Inside wall that the table is on. That is the pot rack I made from a shelf that my Papaw made years ago. Just added hooks!

Photobucket

Back door area. New mini pantry thing we bought to replace the big ugly plastic shelf:

Photobucket


I don't have a photo of it, but we were able to get the dishwasher actually wired to the house instead of having to move a plug around! How exciting! No more ugly plug above the counter, and we don't have to worry about one below it either. 

 My favorite parts are the new dishwasher, deep sink, brighter lighting fixture (It was impossible to see anything with the old tiny bedroom-style fan and light), my pot rack, and the extra little chunk of cabinet and counter space to the right of the stove. It was one crazy week to get this kitchen done, and we were flat wore out, but it was SO worth the final product! 

Bryan said the worst part was the plumbing. We had a terrible time getting the pipes to fit one badly threaded sink drain but thankfully he was able to get it to work without having to return and wait for a new drain. Oil-rubbed bronze drains are very hard to find! 
I love that man of mine! I couldn't ask for more than what the Lord has already given us in our beautiful new kitchen!

Be Inspired!

#8 Most viewed post of 2011
2011 In Review - 2012 So Much To Do!  

Litter Box Cover

This project was interesting, mostly because I didn't really know how I wanted to do it. We have a covered litter box but they aren't very attractive, and when you have a small house and a set-up like mine, there really is nowhere to hide it so our litter box always sat out in the open. 

Yucky!

I currently keep it in the extra room where all of my sewing stuff is because I don't like to have litter boxes right near where people will often be.
(like in bedrooms or living rooms) 
..so I do my best to tuck it away.

The way I have my extra room set up now, there is no tucking it away. It's directly ahead of you on the outside wall when you walk in to the bedroom. At least now you see a box-like thingamajig instead of an ugly blue litter box...

Photobucket

It was pretty simple, too! I was surprised! Basically I measured height, width and depth and cut out my fabric:

~3 pieces 19in tall by 22in deep - The box measured about 18in tall and 21 or so inches deep. You want a little extra for seam allowance. These pieces make up the 2 sides and the top.
~1 piece 19 in by 19in - This piece will make up the back side to bring it all together. I chose to leave the front side completely open. You may opt to make an additional 19x19 piece and cut out a flap. That's up to you and your feline friend!

Then you just pin everything together inside out. 

I chose to sew the seams after I pinned it all together that way I wouldn't get myself too confused about what side was what. It did make it a little awkward but at least I knew what side I was working with.  

Just beware of evil skin-grabbing straight pins ;)

Once it was completely sewn I took a piece of foam poster board that I had leftover from my Fabric Bolts project. I cut it to the finished size of the top piece, fit it snug in there and used straight pins, maybe about 6, to attach the fabric around the board. 
(The pins are not poking out anywhere as I made sure they went parallel in to the board, not straight through.)

I love it because it's so easy to take off and put back on so we can clean the litter box. I can simply pull my straight pins out and wash it if need be, and plus it doesn't look like a litter box!

Be Inspired!