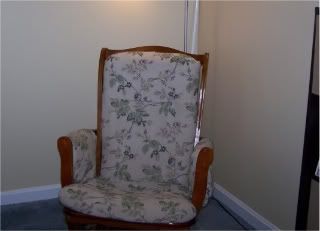
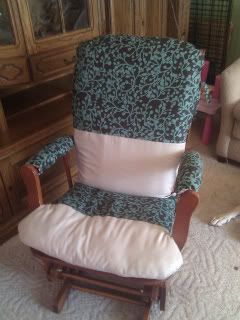
I was fortunate enough a couple of years ago to acquire a rocker/glider chair.
I absolutely love it!!
... except for the cushions.
They were flat and the fabric was definitely nothing I would have picked out for myself but it was free so I never really complained. One day the notion struck me to recover the cushions and that's what I did!
I'm going to show you a picture of it, then try and explain how I did it. (If you are interested) I really get so caught up in these projects that I honestly do not think to stop and photograph the steps.
I really have to work on that!
This project cost me about $7 total. I only had to buy the brown/green patterned fabric.
I already had thread, padding/stuffing and the khaki fabric.
Before:
After:
First I had to cut out the new fabric:
I bought a 100% cotton fabric that is almost like canvas material. It was on clearance for $3.95/yd. I only bought 2 yards. I laid down the original cushions (still with the original fabric on) on top of the new fabric and cut around the form by about 2 1/2 inches from the edge. My thinking was I wanted to be able to stuff the new cover with extra filling to make it more comfortable and full-looking. Plus you want a little room for the seam, about 1/2 inch, and for the curve of the cushion.
Top:
I cut one layer of the patterned cotton fabric. I used that as a pattern for my khaki cotton fabric which I cut 2 layers of. I did 2 layers because it was relatively thin and I wanted to make sure you couldn't see the different colored padding. Then I took that same pattern and cut out only the top half of the patterned cotton. As you can see in the finished product, I wanted the front to be half khaki, half patterned. I ironed the bottom of the 'half' piece under about a 1/2 hem then laid it on top of the khaki pieces, pinned the hem on to it, and sewed across. I then laid that fabric, right sides together, on top of the one piece of patterned fabric, pinned the edges together all the way around except for the bottom, and sewed the pieces together. The bottom was left open so I could turn the fabric right side out and of course put the padding in. For this piece, one side is all patterned and the other is half patterned and half khaki. It can be reversible if I wish, plus you see the pretty pattern from the back of the chair depending on how the chair is positioned in the room
For the bottom (seat) I did the same thing except instead of one full piece of the patterned fabric, I did one full piece of the khaki fabric. I didn't want the seat piece to be reversible so the underside is khaki and the bum side is half patterned, half khaki.
The insides:
My biggest concern for me was the stuffing or filling. I really didn't want to have to buy a foam pad to go inside because that starts bringing the cost of this simple project up to more than I want to pay. Thankfully once I started ripping the original fabric off the cushions I realized I could reuse what I had. I shoved the padding up inside the covers. I had recently went through my daughter's stuffed animal collection and took a few larger animals and unstuffed them. They were going away anyway but I knew I could use their insides! I took my big bag of animal stuffing and filled in the edges of the cushions to make them softer and fluffier, and also filled in the center in several places where the cover was loose and needed to be more full. There really is no right or wrong to that.. you just have to eyeball it and feel it to make sure it's even.
From there I had to sew the cushions shut.
This is where I feel like fingers will get sucked in to machines. With that large padding off to the left and you're trying to maneuver a seam one handed under the presser foot.. it can be scary. I had to have my trusty husband hold up the larger cushion so I could use both hands to hold the seam in place under the needle. I just folded the raw edges in to the opening and held both sides together so it wasn't a raw edge hanging out. I wasn't about to slip stitch those huge openings by hand. Plus nobody is gonna see them.
Tying the cushions to the chair:
I made 4 bias tape-like strips out of the patterned fabric and sewed them on to the cushions. (Fold the piece like you would 3-fold a letter in to itself and sew down the center.) The seat piece I reused Velcro to just loop 2 of the strips around the back of the chairs wooden posts. I sewed the middle of the strips to the seam I had to sew closed on the back. The seat cushion never moved much so the loose velcro'd strips really only serve the purpose of keeping my daughter from pulling it off. The top I used longer strips and sewed the middle of them to the top side edge of the cushions and tied it around the sides of the chair. My new cushion was wider than the chair after re-stuffing so I had to make sure whatever method I used held the top of the cushion firmly in place so you weren't moving the cushion around and having one shoulder on wood and the other awkwardly on the cushion. You had to be there to experience that... it HAD to be fixed! You can see in the photos how the old cushion sat between the wood frame and the new cushions hangs over them.
Final touch, The arm pads:
I hated the way the original pads looked. Plus I had another project idea in mind for the leftover fabric (That blog post will be coming soon!) and wasn't about to use too much of what I had left. I measured the depth of the arm and really just estimated how wide I would need it. I think It might have been about 7 or so inches wide. I cut two equal pieces of the patterned fabric and 2 equal pieces of khaki fabric. Put them right sides together, sewed them all the way around except for about 3-4 inches so I could turn it right said out and stuff it. I didn't fill it completely with stuffing because I need a little bit of leeway to staple the edges to the underside of the arm. I made sure both sides seemed to have equal amounts of stuffing then went to work wrapping the cushions round the arms and staple-gunning them. My luck would be that I ran out of staples and had no more so I had to use a couple of nails on one side to help hold it down. Glad nobody will see that!
I'm very happy with the finished product. It's no pro job but it is way way cheaper than buying new cushions, plus I was able to customize it!


No comments:
Post a Comment
I LOVE comments so please leave one about my post before continuing on your creative journey!