
Saturday, July 16, 2011

Desk/Vanity Redo

THIS excites me!!! 

I have been itching to redo of a piece of furniture (paint-wise) for a while. 

I finally did it!!

Last year I got a desk from my mom. 
Well, really it was from my aunt and uncle but my mom came by the house with a big desk in the back of her truck.

I told her she surely did not need any more furniture in her little house so convinced her to let me have it. Since then it has served a convenient purpose in my extra room, especially when I got my sewing machine in December. 
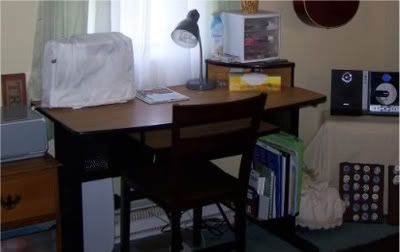
Can't beat FREE!!

Photobucket


In September of last year I also decided to go buy a vanity (or anything I could find that would work) to use as a vanity table. I have Plantar Fasciitis so standing in the bathroom for an extended period of time to do my hair/make-up was very hard on my feet. I found the perfect little desk with all kinds of beautiful potential... I think I paid $25-$30 for it.
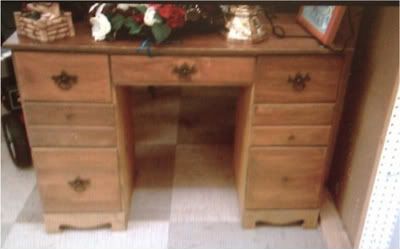
Photobucket


I'm slowly in the process of trying to put our house together and I really wanted to get my sewing room set up the way I want it. That involved moving my vanity from my bedroom to the sewing room. After standing back and looking, everything was so mismatched and it drove me crazy!! Sooo... a little hunting around online and I decided to repaint the desk and vanity to match so I could get the ball rolling on the decor process.

My Inspiration: 

After a little color debate I settled for pink and white 

...and this is what I got...


Photobucket


I decorated it with perfumes and pretties my mom gave me that she inherited from my recently passed Mamaw. I think they made a beautiful addition.

Forgot about the white mirror I had tucked away.. PERFECT fit!
I was using a big square brown-framed one from Kirkland's. Got this white mirror off Craigslist last year originally for my bathroom whenever we redid it. Still have not redone it...


Photobucket


I LOVE the new knobs I bought for it! They are like a pewter color... $5 for all of those brand new!! 
(at a local store that sells stuff they buy by the truck loads from department stores and such.)


Photobucket

In the finished product I got rid of the shelf that was in the top right corner, and the shelf on the bottom right, as well as a roll-out keyboard tray that was attached under the desk.

I'm definitely thrilled at the results!!

I won't get in to too many details about how I did everything. It's pretty simple. Sanding and painting. 

A couple notes: I do not recommend spray paint for this. I used it at first and had to go out and buy a paint+primer in one paint to finish the project. I only used the spray paint ultimately for the metal legs on the desk as well as the black rubber-like strip that went around the outer edge of the desk. It was the only way I knew to make it white. Give that stuff plenty of time to dry! It took nearly 2 days for it to not be tacky to the touch any longer. Rubber is not easy to paint apparently!


In total, this project cost maybe $30 for the stencil, paint, and hardware. 

Be Inspired!

#1 Most viewed project of 2011!!
2011 In Review - 2012 So Much To Do! 

Saturday, July 9, 2011

Home Improvement: Kitchen Finished Result

I just realized I never came back and posted the finished results of our kitchen makeover! 

I won't go in to much detail about what I did since I spotlighted most of the plans in the Home Improvement post, so here are finished photos for you to enjoy! Hubby and I did almost everything on our own except cutting and installing the counter tops, and the rewiring of the dishwasher. 

What you see when you enter the kitchen:

Photobucket

Sink area... new dishwasher and freshly painted cabinets with new hardware!

Photobucket

New sink and faucet:

Photobucket
Photobucket

Inside wall that the table is on. That is the pot rack I made from a shelf that my Papaw made years ago. Just added hooks!

Photobucket

Back door area. New mini pantry thing we bought to replace the big ugly plastic shelf:

Photobucket


I don't have a photo of it, but we were able to get the dishwasher actually wired to the house instead of having to move a plug around! How exciting! No more ugly plug above the counter, and we don't have to worry about one below it either. 

 My favorite parts are the new dishwasher, deep sink, brighter lighting fixture (It was impossible to see anything with the old tiny bedroom-style fan and light), my pot rack, and the extra little chunk of cabinet and counter space to the right of the stove. It was one crazy week to get this kitchen done, and we were flat wore out, but it was SO worth the final product! 

Bryan said the worst part was the plumbing. We had a terrible time getting the pipes to fit one badly threaded sink drain but thankfully he was able to get it to work without having to return and wait for a new drain. Oil-rubbed bronze drains are very hard to find! 
I love that man of mine! I couldn't ask for more than what the Lord has already given us in our beautiful new kitchen!

Be Inspired!

#8 Most viewed post of 2011
2011 In Review - 2012 So Much To Do!  

Litter Box Cover

This project was interesting, mostly because I didn't really know how I wanted to do it. We have a covered litter box but they aren't very attractive, and when you have a small house and a set-up like mine, there really is nowhere to hide it so our litter box always sat out in the open. 

Yucky!

I currently keep it in the extra room where all of my sewing stuff is because I don't like to have litter boxes right near where people will often be.
(like in bedrooms or living rooms) 
..so I do my best to tuck it away.

The way I have my extra room set up now, there is no tucking it away. It's directly ahead of you on the outside wall when you walk in to the bedroom. At least now you see a box-like thingamajig instead of an ugly blue litter box...

Photobucket

It was pretty simple, too! I was surprised! Basically I measured height, width and depth and cut out my fabric:

~3 pieces 19in tall by 22in deep - The box measured about 18in tall and 21 or so inches deep. You want a little extra for seam allowance. These pieces make up the 2 sides and the top.
~1 piece 19 in by 19in - This piece will make up the back side to bring it all together. I chose to leave the front side completely open. You may opt to make an additional 19x19 piece and cut out a flap. That's up to you and your feline friend!

Then you just pin everything together inside out. 

I chose to sew the seams after I pinned it all together that way I wouldn't get myself too confused about what side was what. It did make it a little awkward but at least I knew what side I was working with.  

Just beware of evil skin-grabbing straight pins ;)

Once it was completely sewn I took a piece of foam poster board that I had leftover from my Fabric Bolts project. I cut it to the finished size of the top piece, fit it snug in there and used straight pins, maybe about 6, to attach the fabric around the board. 
(The pins are not poking out anywhere as I made sure they went parallel in to the board, not straight through.)

I love it because it's so easy to take off and put back on so we can clean the litter box. I can simply pull my straight pins out and wash it if need be, and plus it doesn't look like a litter box!

Be Inspired!

Tuesday, June 28, 2011

Rocker/Glider Cushion Recover

I was fortunate enough a couple of years ago to acquire a rocker/glider chair. 

I absolutely love it!!
... except for the cushions. 

They were flat and the fabric was definitely nothing I would have picked out for myself but it was free so I never really complained. One day the notion struck me to recover the cushions and that's what I did! 

I'm going to show you a picture of it, then try and explain how I did it. (If you are interested) I really get so caught up in these projects that I honestly do not think to stop and photograph the steps. 
 I really have to work on that! 

This project cost me about $7 total. I only had to buy the brown/green patterned fabric. 
I already had thread, padding/stuffing and the khaki fabric.

Before:
Photobucket

After:
Photobucket


First I had to cut out the new fabric:
I bought a 100% cotton fabric that is almost like canvas material. It was on clearance for $3.95/yd. I only bought 2 yards. I laid down the original cushions (still with the original fabric on) on top of the new fabric and cut around the form by about 2 1/2 inches from the edge. My thinking was I wanted to be able to stuff the new cover with extra filling to make it more comfortable and full-looking. Plus you want a little room for the seam, about 1/2 inch, and for the curve of the cushion.

Top:
I cut one layer of the patterned cotton fabric. I used that as a pattern for my khaki cotton fabric which I cut 2 layers of. I did 2 layers because it was relatively thin and I wanted to make sure you couldn't see the different colored padding. Then I took that same pattern and cut out only the top half of the patterned cotton. As you can see in the finished product, I wanted the front to be half khaki, half patterned. I ironed the bottom of the 'half' piece under about a 1/2 hem then laid it on top of the khaki pieces, pinned the hem on to it, and sewed across. I then laid that fabric, right sides together, on top of the one piece of patterned fabric, pinned the edges together all the way around except for the bottom, and sewed the pieces together. The bottom was left open so I could turn the fabric right side out and of course put the padding in. For this piece, one side is all patterned and the other is half patterned and half khaki. It can be reversible if I wish, plus you see the pretty pattern from the back of the chair depending on how the chair is positioned in the room

For the bottom (seat) I did the same thing except instead of one full piece of the patterned fabric, I did one full piece of the khaki fabric. I didn't want the seat piece to be reversible so the underside is khaki and the bum side is half patterned, half khaki.

The insides:
My biggest concern for me was the stuffing or filling. I really didn't want to have to buy a foam pad to go inside because that starts bringing the cost of this simple project up to more than I want to pay. Thankfully once I started ripping the original fabric off the cushions I realized I could reuse what I had. I shoved the padding up inside the covers. I had recently went through my daughter's stuffed animal collection and took a few larger animals and unstuffed them. They were going away anyway but I knew I could use their insides! I took my big bag of animal stuffing and filled in the edges of the cushions to make them softer and fluffier, and also filled in the center in several places where the cover was loose and needed to be more full. There really is no right or wrong to that.. you just have to eyeball it and feel it to make sure it's even.

From there I had to sew the cushions shut.
This is where I feel like fingers will get sucked in to machines. With that large padding off to the left and you're trying to maneuver a seam one handed under the presser foot.. it can be scary. I had to have my trusty husband hold up the larger cushion so I could use both hands to hold the seam in place under the needle. I just folded the raw edges in to the opening and held both sides together so it wasn't a raw edge hanging out. I wasn't about to slip stitch those huge openings by hand. Plus nobody is gonna see them.

Tying the cushions to the chair:
I made 4 bias tape-like strips out of the patterned fabric and sewed them on to the cushions. (Fold the piece like you would 3-fold a letter in to itself and sew down the center.) The seat piece I reused Velcro to just loop 2 of the strips around the back of the chairs wooden posts. I sewed the middle of the strips to the seam I had to sew closed on the back. The seat cushion never moved much so the loose velcro'd strips really only serve the purpose of keeping my daughter from pulling it off. The top I used longer strips and sewed the middle of them to the top side edge of the cushions and tied it around the sides of the chair. My new cushion was wider than the chair after re-stuffing so I had to make sure whatever method I used held the top of the cushion firmly in place so you weren't moving the cushion around and having one shoulder on wood and the other awkwardly on the cushion. You had to be there to experience that... it HAD to be fixed! You can see in the photos how the old cushion sat between the wood frame and the new cushions hangs over them.

Final touch, The arm pads:
I hated the way the original pads looked. Plus I had another project idea in mind for the leftover fabric (That blog post will be coming soon!) and wasn't about to use too much of what I had left. I measured the depth of the arm and really just estimated how wide I would need it. I think It might have been about 7 or so inches wide. I cut two equal pieces of the patterned fabric and 2 equal pieces of khaki fabric. Put them right sides together, sewed them all the way around except for about 3-4 inches so I could turn it right said out and stuff it. I didn't fill it completely with stuffing because I need a little bit of leeway to staple the edges to the underside of the arm. I made sure both sides seemed to have equal amounts of stuffing then went to work wrapping the cushions round the arms and staple-gunning them. My luck would be that I ran out of staples and had no more so I had to use a couple of nails on one side to help hold it down. Glad nobody will see that!

I'm very happy with the finished product. It's no pro job but it is way way cheaper than buying new cushions, plus I was able to customize it!

Be Inspired!

#7 Most viewed post of 2011
2011 In Review - 2012 So Much To Do!  

Saturday, June 25, 2011

Fabric Bolts

Before I go too far: This was not originally my idea. I read about it here :)

A few months ago my Mamaw gave me two boxes full of scrap fabric. She had been cleaning out her sewing area and knew that I was getting in to the hobby. It was an absolutely awesome gift for someone like me and I was thrilled to bring it all home.

But I had no clue what to do with it!

It sat in my closet in big clear plastic tubs for a few weeks. I really didn't do anything with it, either. It was such a pain to get to, dig through, and put back. Finding the above link on a forum turned it all around! 

Whodathunk you could display your scrap fabric just like they do in the stores, but on a smaller scale?!

In the above link, the blogger used comic book boards. Unfortunately for me the notion struck me to do this project after the Hobby shop in town closed so hubby rushed me around to a few other stores until I finally got the brilliant idea: foam poster board cut in to rectangles! Dollar Tree, here we come!! I bought 10 boards for a whopping $10. Each board allowed me to cut 9 rectangles. I used a scrapbooking knife that glided very easily through the board. It's D.T. foam board though so not like you're working with high quality stuff, however... I will not complain. It did what I needed!

After cutting all of the foam board up I did pretty well what the blogger did, folded the fabrics neatly to the height of the board and wrapped it around. You'll see in my pictures that they aren't all the same height. 

Yeaaah maybe neatly was an overstatement.

Personally I found it best to pin the ends down in to the foam so it wouldn't slip off the board or become a pain when storing and removing. Ever since I have done this, I have had easier access to all the wonderful scraps my Mamaw game me, plus new fabrics, and have been able to complete more projects.

You can see I did floral prints, linear prints, solids, plaids and so on with my organizing....
Photobucket

Photobucket

I store my fabrics in one of those cubical shelves. I took the fabric cubes out and put them in the top of my closet to store craft stuff, other scraps and project things. My plan is to eventually get another cubical shelf and stack it on top of this one that way I can bring my cubes back out of the closet and of course have more space to store more fabrics.

Obviously not all of your scraps are big enough to bolt. What I did with the smaller pieces was fold them up to about 3 of 4 inch pieces then 'file' them in a plastic shoebox container. That way when I open it I can see all my fabrics from the top, and I can even see them from the outside along the sides of the box. With both the shoebox and the bolts I organized them by prints, solids, plaids, etc. to make it look neater and much easier to locate what you want.

This is probably one of the most organized spots in my whole house. The big thing is once you take fabric off the 'bolt' is to return it to the bolt and store it back. I am still having a hard time with that lol.

Be Inspired!


Friday, June 24, 2011

Car Seat Re-Cover

This week I tackled a crazy task. When doing some hunting around on www.ChildMade.com I found some blogs of folks who had done car seat re-covers. 

My first thought was, no way! But of course when I saw it, yes way! 

Then I thought, that has to be extremely difficult, so I shrugged it off and didn't think of it again until I took the cover off Jaiden's seat to be washed. After washing it and letting it dry I realized it looked dirty still and I wasn't pleased with the look any longer. The icky brown stained so easily and looked nasty all the time despite being clean. I have the Eddie Bauer 3-in-1 Convertible seat.

FYI: I did not remove any parts of the seat padding, I simply covered over the original fabric which was fused to the padding.

I picked out two fabrics from my collection (that means it was freeeeee!) that matched; one print and one solid. I chose a blue solid with a pink/green/blue linear print. For the thread I grabbed a bright pink color. You can't see it in the photos (well, it's the same thread color I used for the embroidery) but it looks neat around the edging of the blue.. makes it pop a little!

Photobucket

Photobucket

Really it is just a matter of ripping seams, laying the pieces on your fabric, pinning it together, cutting the fabric, and sewing the seams back together. 

When I got to the seat area is when it got difficult. Navigating large chunks of fabric sewn together around a little machine isn't easy but I managed. I tried to watch what I pieced together and when I pieced it together so I could keep it from being so difficult. At some point you just have to deal with it and do your best not to slip your finger under the presser foot as you hold large padded pieces and shove them under the foot. 

In this process you will use a lot of straight pins and a seam ripper!!

The last step I did was embroidering the pillow. I honestly forgot about the pillow. My daughter never used it but when I thought of embroidering it I couldn't help but do it... and I was so proud of myself! Not to mention Jaiden loves it. I have the Brother SE-400 Sewing and Embroidery machine. It is a dream to sew with and this project was the first time I ever did embroidery with it. You literally push a button and it does it for you! Fabulous! I admit when I ripped the seams of the pillow and sewed the embroidered fabric back on, I did it crooked so it makes the embroidery look crooked. 
Nonetheless...

Photobucket

Some Tips Before You Get Started:

- Make sure you have the proper instructions handy for the car seat you are using. I can't find my book so I had to get the manual on the internet. You want to make sure you have this readily available for removing the belts and cover properly, and of course re-assembling them properly. We don't want to compromise the safety of the seat by putting it back together wrong!

- Don't remove parts and not use them. All the padding is there for a reason.

-Double DOUBLE check the padding when you are done for straight pins. I strongly suggest you use the pins with the glass heads so they are easier to work with and stand out more that a small tip head. You realllly don't want to put your padding back on with pins in it and have your toddler figure that out unexpectedly one day driving down the road.

- Use a strong needle, like one for denims. I think I already had the denim gauged needle on my machine. I don't remember ever switching it out. I have never broken or bent a needle in all my, watch out now, 6 months of owning my sewing machine.. and I have been pretty rough with them. But either way, you don't want to be very in to your project and have to stop to change out a needle and rethread it.

-Be prepared to get attacked. I got attacked by straight pins in the sewing process. I got attacked by a seam ripper in the seam ripping process. It just comes with the territory and you seasoned sewers surely know that by now. Just whatever you do, don't let the sewing machine attack you! I have heard of people getting fingers caught in machines. It hurts me to even think about it!

- Be prepared to spend up to about 5 hours on your project. I spent 2 hours uninterrupted one night, and about 3 or 4 hours slightly interrupted the next day. For smaller seats like infant carriers you might spend less time. I didn't do a bunch of detail on mine so that helped cut the time. In the original seat padding you can see the diamond patter on the upper part.. I didn't stitch that in to the new fabric. Thought about it, but it wasn't necessary and I was ready to get this thing done.

- Finally, just have fun with it! Let your kiddos pick out favorite colors if they are old enough, maybe try something neutral if you plan to have more children that may use the seat, and take breaks. Don't try and force yourself to finish it all in one day. Do it during a period where you know you won't be going anywhere if there isn't an extra seat handy.

- Oh, and I wouldn't do it if the seat is close to expiring or your child is about to grow out of it. Yes, car seats expire. Check the back side ;)

Be Inspired!

#10 Most viewed post of 2011
2011 In Review - 2012 So Much To Do!  

Wednesday, May 11, 2011

Sewing and fun projects!

I have been all over the internet lately looking up fun projects and things to do with my scrap fabric. Since I got my sewing machine for Christmas I am seriously spoiled. Not to mention all the fabric my wonderful Mamaw gave me! I have a couple of friends that are pregnant so I was really interested in finding easy projects to make as gifts, only to find out that now I am pregnant and will probably need some of them myself! I wanted to share a few links of fun artsy/sewing projects plus a few maternity projects. If you don't need them, surely somebody you know may need them and it could be fun to pass it on or even make it for them!

Hope you enjoy some of these great ideas, and don't be afraid to Google anything you can buy from the store to see if someone out there has a tutorial for a DIY version! And definitely search the first link I have provided below. You can find tons of neat stuff there.

~ First, let me share ChildMade It such a fun site with tons of project ideas!!! You can probably go through page after page and find enough stuff to empty your craft box in a matter of minutes. Some of the things I have marked as a favorite for easy access are:

~ Burp cloths. A way to gift them beautifully, make your own unique ones, and spruce up the boring store bought ones! I have a box full of burp cloths from poor Jaiden, who had pretty bad reflux for about 7 months. What a fun way to dig them out and make them more cute!


~ Maternity belly band. Who wants to pay $10-$20 for something you could make with what you have in your fabric box or closet?!


~ Make your own crib skirt! I think this is such a neat idea to do your own bed clothes decorating rather than pay for an expensive bedding set. Simply make your bed skirt, buy a coordinating sheet, and even make your own comforter!


~ DIY Carseat covers! Here's another one. My baby is due in the dead of winter so this is a fantastic idea for the cold months. Jaiden was born in the summer so by the time the cold weather hit we were able to bundle her up in winter suits.


~ Scrap fabric headband. I have made several of these so far. It is so fun to dig in your scrap fabric and make a quick headband to match your clothes for the day. It literally takes me about 10 minutes to make one. And I just dig through my ribbon and button drawers to make a bow or pretty to go on it.


~ This is not part of the Childmade link (at least I didn't find it there) but wanted to share it anyway. Thrift store refashioned skirt to maternity skirt. This is just so easy! I have bought so many cute skirts and tops from Goodwill and consignment shops for next to nothing compared to those awful retail prices. With this project if you screw up you're not out that $30 clothing item you bought! I love thrift stores!!